Difference between revisions of "X-Payments:Using X-Payments with Magento"
m (→Connecting Magento to X-Payments) |
m (→Video tutorials) |
||
| Line 6: | Line 6: | ||
==Video tutorials== | ==Video tutorials== | ||
| − | [[X-Payments:Video_Tutotials_on_Using_X-Payments_with_Magento | Video Tutotials on Using X-Payments with Magento]] | + | :* [[X-Payments:Video_Tutotials_on_Using_X-Payments_with_Magento | Video Tutotials on Using X-Payments with Magento]] |
==Connecting Magento to X-Payments== | ==Connecting Magento to X-Payments== | ||
Revision as of 17:31, 1 November 2017
A Magento store can be connected to X-Payments web-based payment application to process payments from customers and save their credit card data in a PCI DSS compliant way.
This section provides information on how to connect X-Payments to your Magento store and how to handle payments in your Magento store using X-Payments.
Video tutorials
Connecting Magento to X-Payments
Payments via X-Payments in Magento: Customer experience
Magento checkout routine when using X-Payments
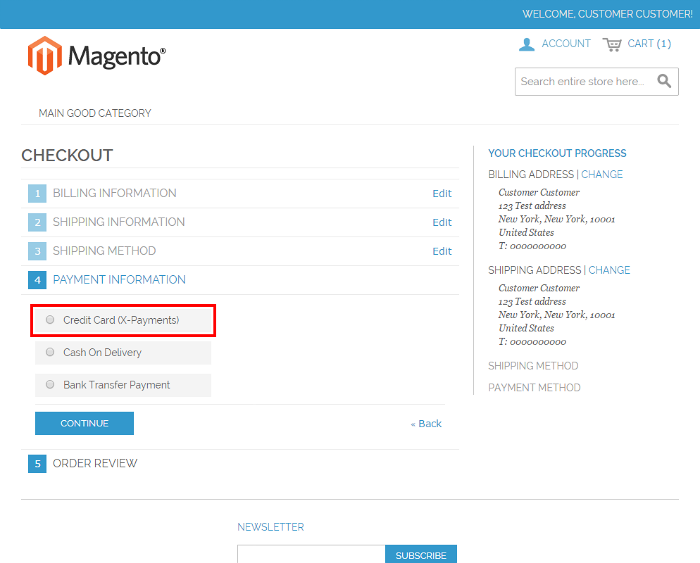
After the payment method for accepting credit card payments via X-Payments has been enabled in the admin panel of your Magento store, this method is added to the list of payment methods available to buyers:
Depending on the "Use iFrame" setting as provided in your store's Payment Methods configuration, the checkout process for buyers who choose to pay using this method may follow two alternative paths. One of them - the one relying on the iFrame technology - allows the buyer to enter their credit card details using a secure X-Payments-generated credit card form that is embedded directly into your Magento store's checkout page. The other one - which does not involve using iFrame - requires that the buyer should complete the secure credit card form on a separate page, which involves redirecting them off your site.
iFrame vs. Separate page
Let's see what the checkout process looks like in stores providing the credit card form to buyers using the iFrame method.
If, according to the "Show credit card form at" setting in your store's Payment Methods configuration, the secure credit card form is configured to appear at the Payment Information step, the form is displayed to the buyer immediately after they have selected the payment method: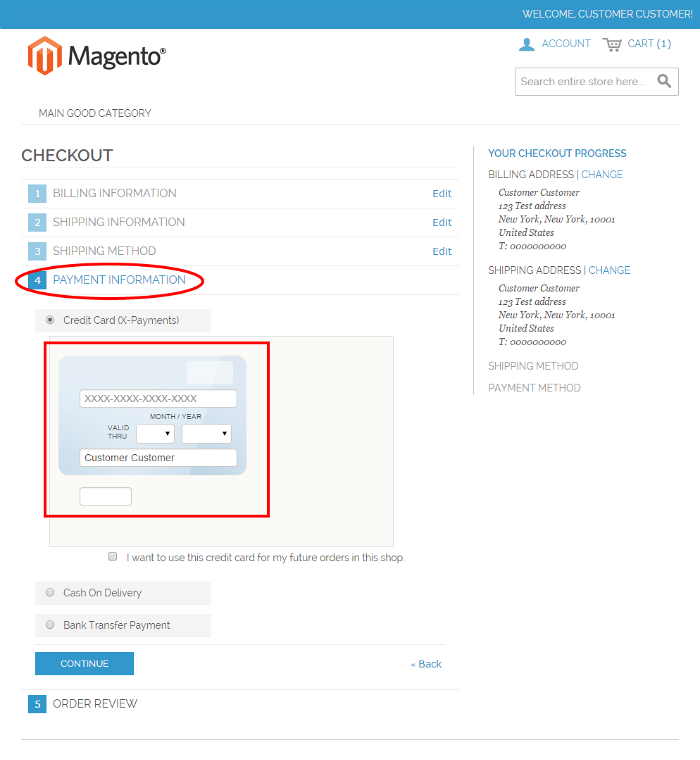
After completing their payment information, the buyer reviews their order: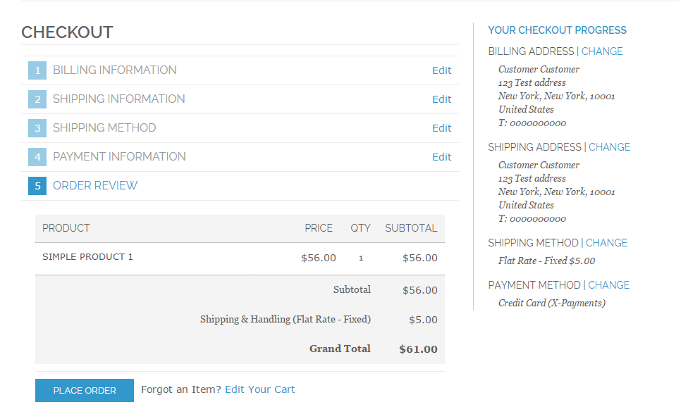
and submits it: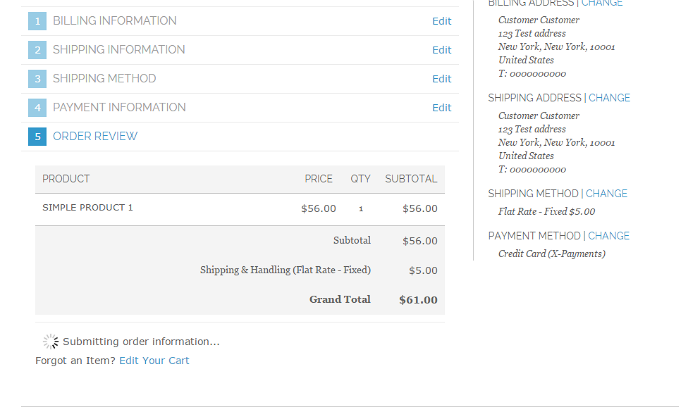
If the "Show credit card form at" setting says the credit card form must appear at the Order Review step, the only thing the buyer does at the Payment Information step is select the payment method, whereas the entering of credit card details takes place at the Order Review step: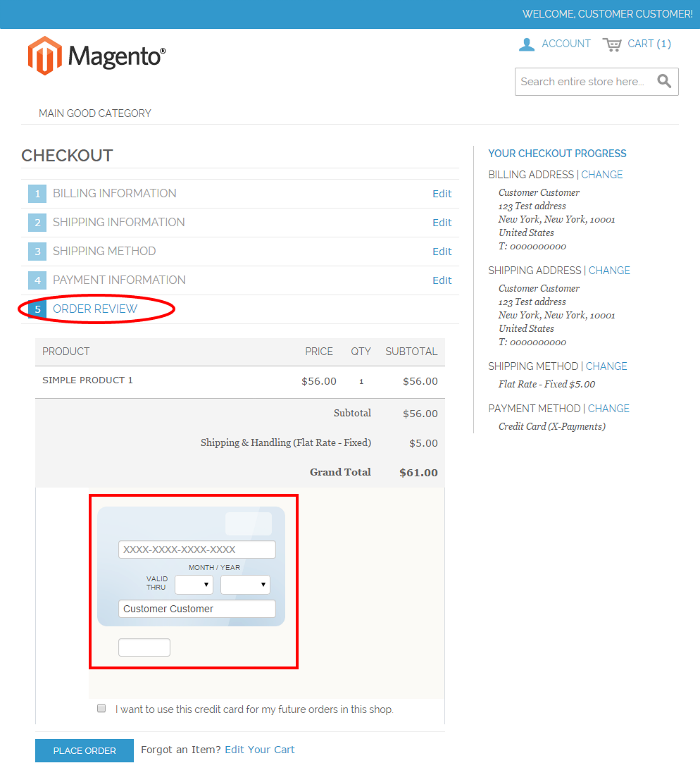
Once the order is submitted, the buyer's payment information is processed, and the buyer sees the order received screen:
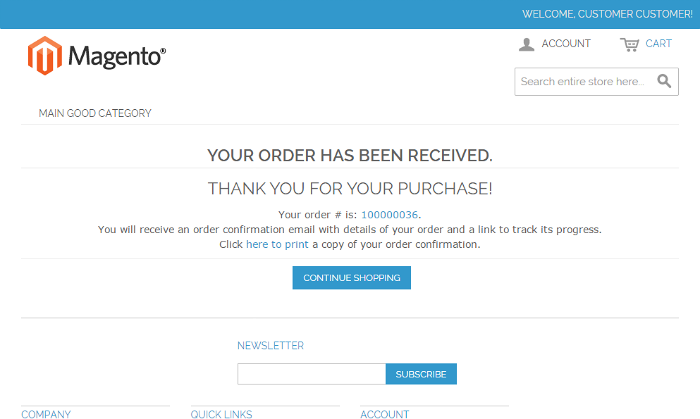
Now let's see what the checkout process looks like in a store using the secure credit card form on a separate page.
If the store is configured not to use iFrame, at the Payment Information step the buyer selects the payment method: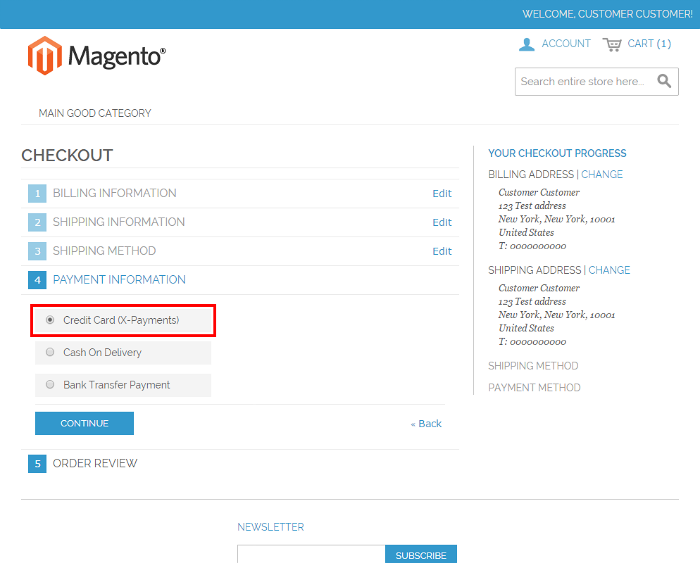
and continues to the Order Review step where they can review the order before completing the purchase:
Once the PLACE ORDER button is clicked, the buyer is redirected away from the store site to a page with the credit card form: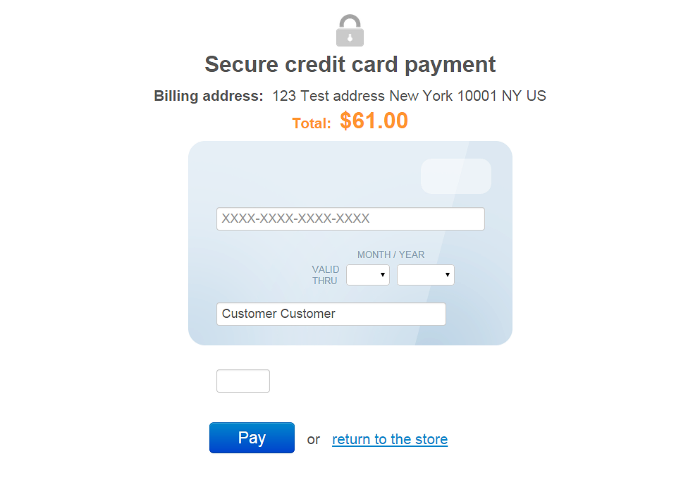
The buyer enters their credit card details into the form and selects "Pay". As a result, the information they entered is submitted to the payment gateway: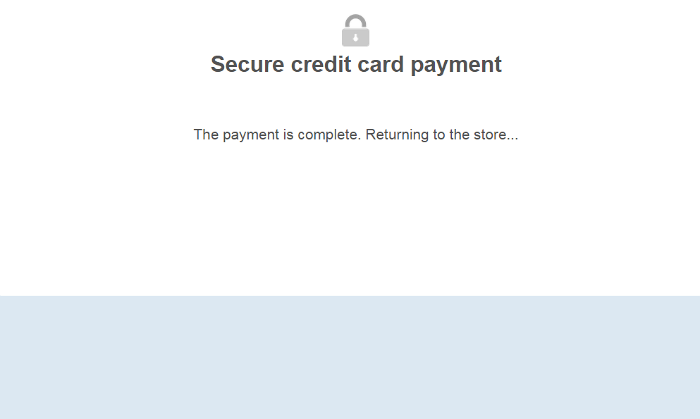
The buyer returns to the store site and, provided that the transaction has been successful, sees the order received screen:
PCI compliant credit card saving
When you enable the "Use saved credit cards" X-Payments payment method, your customers get the option to save their credit card details so they won't have to re-enter them every time they make a purchase at your store. Note that the option is available only to registered customers.
Credit card details are saved in a PCI compliant manner: no credit card information is stored in your Magento store; instead, the information is stored in a PCI compliant credit card vault of the payment system. Re-use of saved credit cards by your Magento store is made possible through the use of tokenization - an approach that replaces sensitive cardholder info with a unique identifier (a "token").
A Magento store configured to support credit card saving provides two places where a customer can choose to save their card: the checkout page and the section "MY PAYMENT CARDS" in the customer's user account.
The checkout page allows the customer to save the details of the credit card with which they are going to pay for the current purchase. If the secure credit card form is embedded into the checkout page as iFrame, the option "I want to save this credit card for my future orders in this shop" apears right beneath the credit card form and can be selected after completing the credit card details: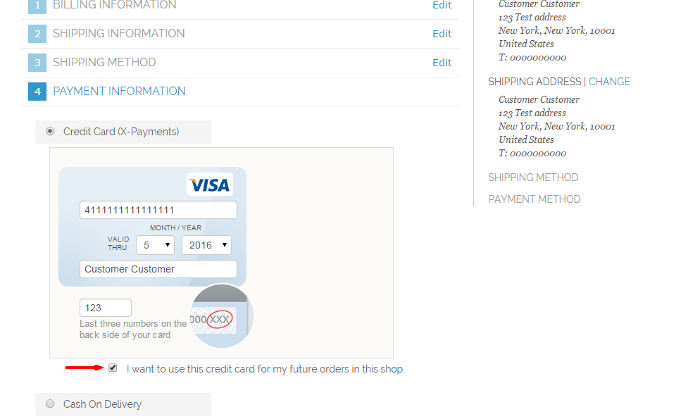
If the store is configured to display the secure credit card form on a separate page, the option "I want to save a credit card for my future orders in this shop" is displayed before the customer goes to the page with the credit card form: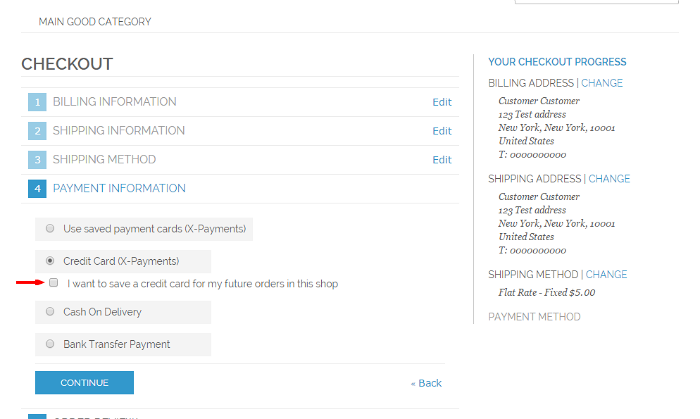
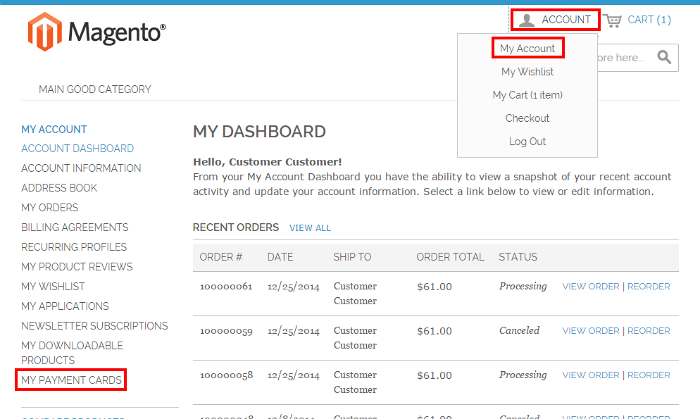
The "MY PAYMENT CARDS" section in the customer's account can be accessed by selecting ACCOUNT -> My Account -> MY PAYMENT CARDS:
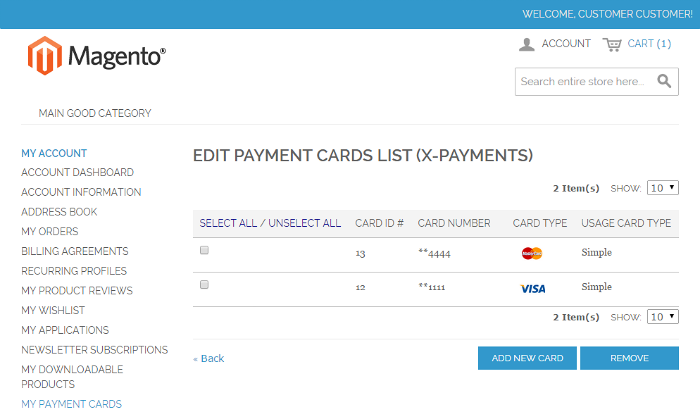
The customer can use this section to add new cards and manage the cards they have saved previously:
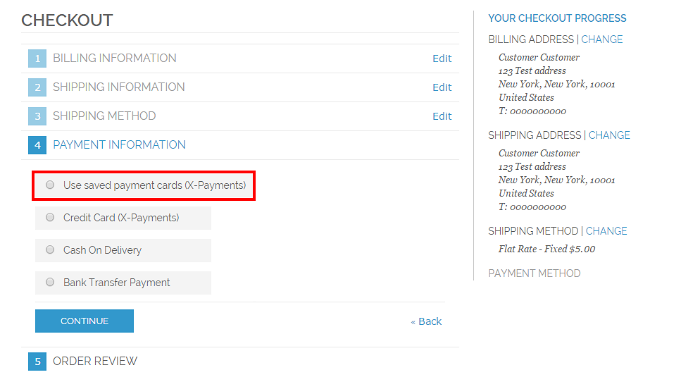
When a customer has at least one saved credit card, they can use it to pay for orders. This is done using the "Use saved credit cards (X-Payments)" payment method:
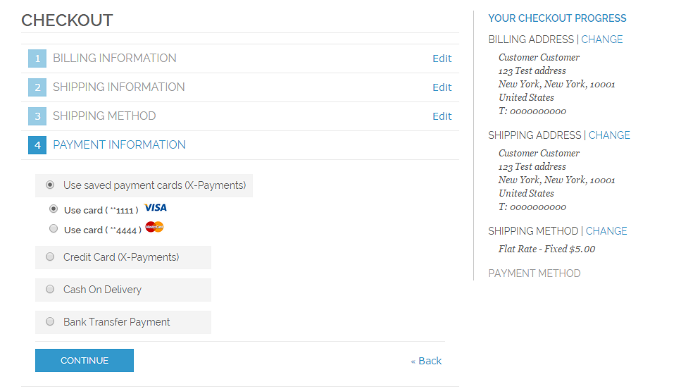
When the customer has more than one saved credit card, they can choose which of the credit cards to use:
Payments via X-Payments in Magento: Administrator experience
Capturing payments
If payment for an order is performed in the "Auth and capture" mode ("Initial transaction = Auth and capture" in the payment configuration settings in X-Payments and "Use forced Authorize operation = No" in the X-Payments connector payment method settings in Magento), the customer is charged for the order at the time of order creation. However, in a workflow where the initial payment transaction is performed in the "Authorization only" mode ("Initial transaction = Auth" in X-Payments and/or "Use forced Authorize operation = Yes" in Magento), no money changes hands immediately after order creation: the payment transaction is done only to obtain an authorization for the amount listed as the order Grand Total, and you have to take a few additional steps to capture the amount that was authorized.
Below we discuss how to capture the funds for which an authorization has been obtained as a result of the customer making a payment in the "Authorization only" mode.
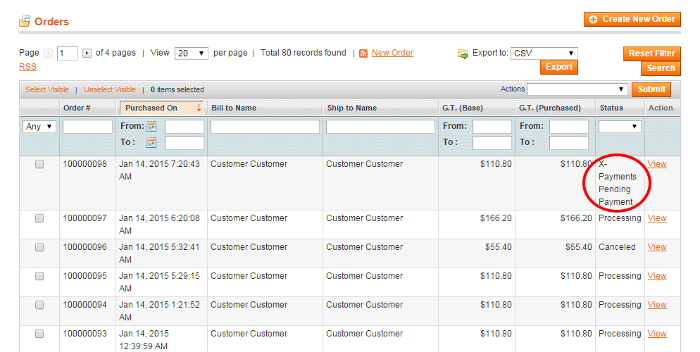
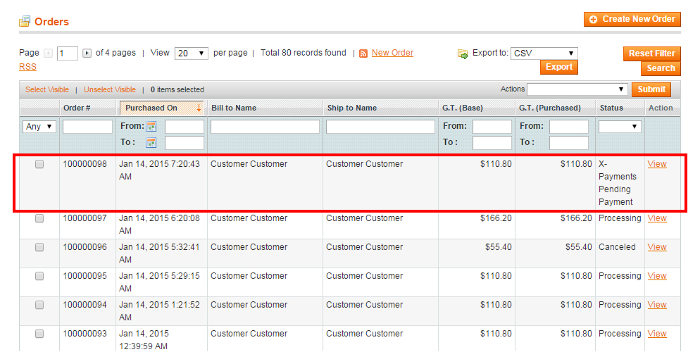
For orders for which an authorization has been obtained via X-Payments, Magento uses a special status: X-Payments Pending Payment (In the Magento front end, the same status is named "X-Payments Authorized Payment").
When an order has this status, you know that a capture needs to be performed on it. Please note that when an authorization to capture a certain amount is obtained, this amount is reserved on the customer's account for you to capture only for a limited time; for this reason, when you get an order with the "X-Payments Pending Payment" status, be sure to keep an eye on it and perform the capture before the authorization expires.
The main method that can be used to capture a previously authorized amount is based on creating an invoice. If required, multiple invoices can be created for a single order, each containing as many or as few of the purchased items as you specify.
To perform a capture:
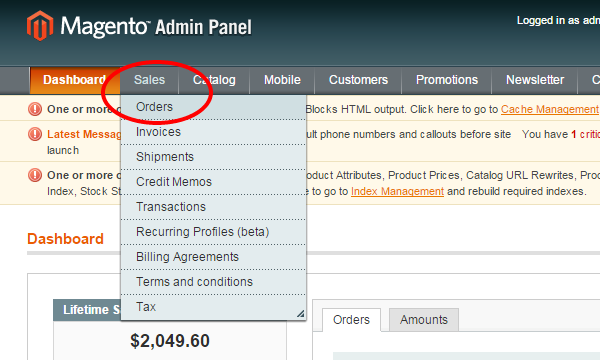
- In the Admin panel, select Sales > Orders:
- In the Orders list, locate the order for which you want to perform a capture and click to open the order details.
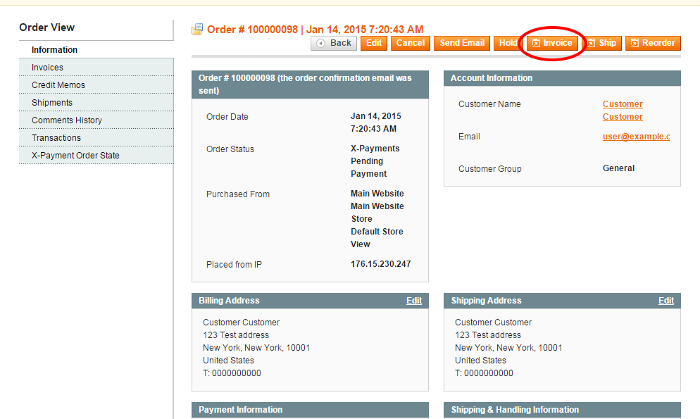
- In the upper right, click the Invoice button:
This opens a new invoice page: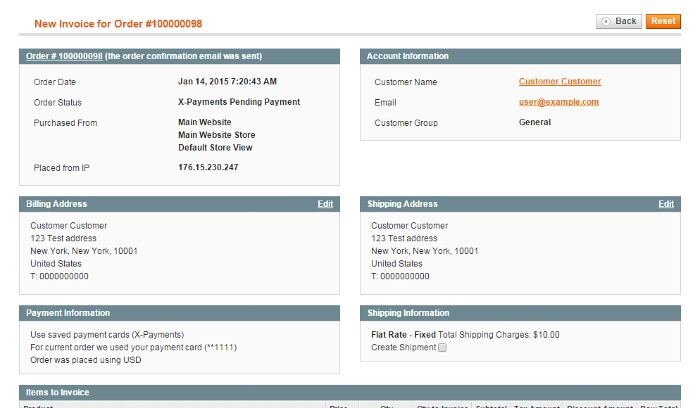
- Scroll down to the Items to Invoice section.
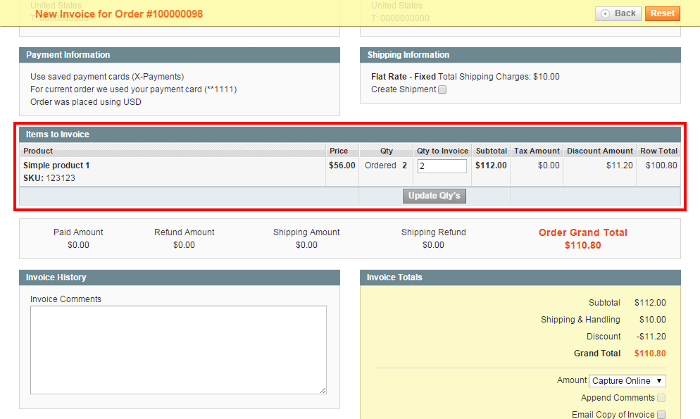
This section provides a list of items you can invoice and their respective quantities. By default, the invoice will be created for the entire order. If you are going to invoice only some of the items and do a partial capture this time, update the quantities to invoice (specify the correct quantities in the Qty to invoice column and click the Update Qty's button); the invoice totals will be re-calculated.Important: Before using partial capture, make sure your payment gateway supports this feature. - Work through the invoicing process as usual: add a tracking number, create a packing slip, enter invoice comments as needed, specify whether a copy of the invoice needs to be emailed to the customer and whether your comments need to be appended to it.
- In the Amount field, select the payment action you require:
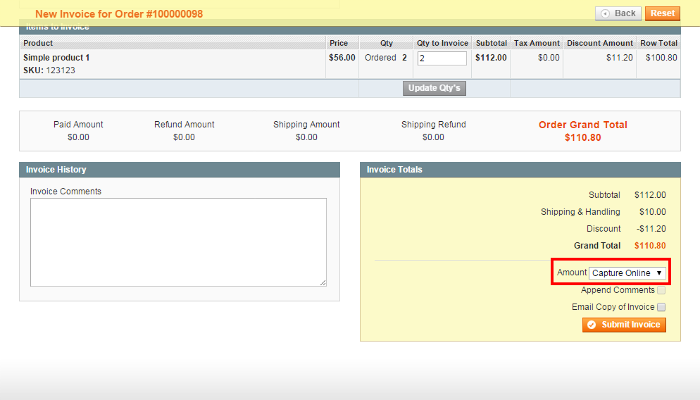
- Capture Online: Upon invoice submission, the invoice amount will be captured (a request to capture the specified amount will be sent through X-Payments to the payment gateway). After the capture, you will have the ability to create a credit memo should you require to issue a refund.
- Capture Offline: Upon invoice submission, the system will not capture the payment (no request to capture the payment will be sent). This option should be selected if the capture of funds is performed directly through the gateway or through the X-Payments back end. Note that after using the "Capture Offline" option you will no longer have the option to capture this payment through your Magento store. You will have the ability to create a credit memo.
- Not Capture: Upon invoice submission, the system will not capture the payment (no request to capture the payment will be sent). This option assumes that you will capture the payment at a later date. The completed invoice (you will be able to access it through Order View > Invoices) will have a Capture button allowing you to complete the task:
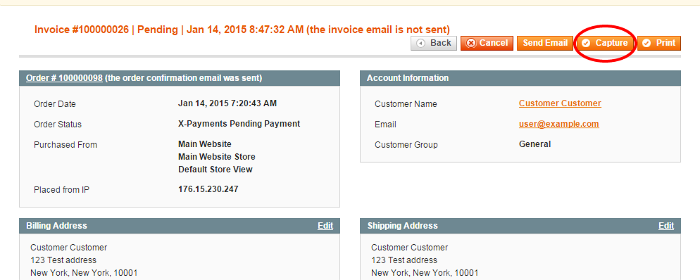
Before the payment is captured, you will able to cancel the invoice. After capturing you will be able to create a credit memo.Important: Do not select “Not Capture” unless you are certain that you are going to capture the payment through Magento at a later date. You will not be able to create a credit memo until the payment has been captured using the Capture button.
- Click the Submit Invoice button to process the invoice.
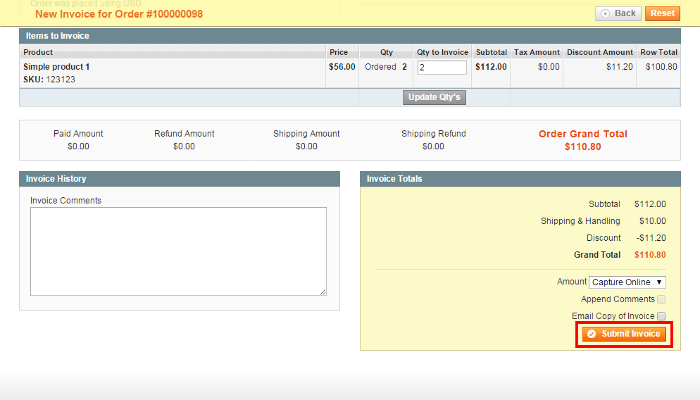
The invoice will be created. The selected payment action (Capture Online, Capture Offline or Not Capture) will be applied.
Now if you go back to the order details and click on the Invoices tab under the Order View menu, you should be able to see the new invoice added to the list of invoices pertaining to the order: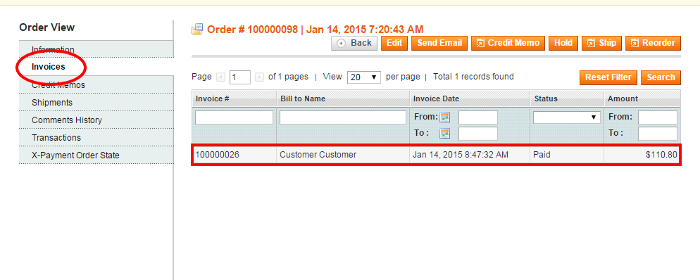
An invoice created with the "Capture Online" option or captured after it has been created with the "Not Capture" option will have the status Paid. The respective capture transaction will appear in the X-Payments back end with the status Charged.
An invoice created with the "Capture Offline" or "Not Capture" option will have the status Pending; no transaction will be reflected in X-Payments.
Issuing refunds
After an order has been paid and invoiced, the entire order, or a portion of it, can be refunded. The basic method to do a refund in Magento is by issuing a credit memo.
To issue a refund:
- In the Admin panel, select Sales > Orders:

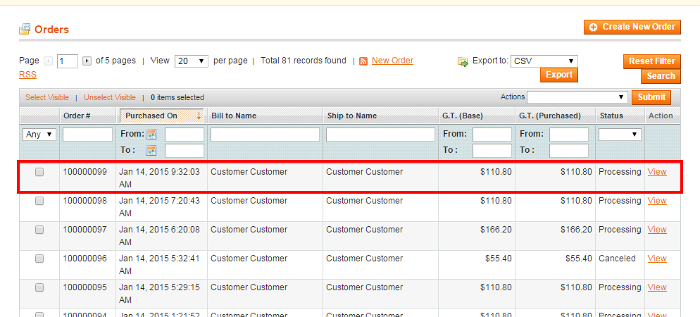
- In the Orders list, locate the order for which you want to issue a refund and click to open the order details:
- In the Order View menu on the left-hand side of the screen, select the Invoices tab. This opens a list of invoices pertaining to the order:
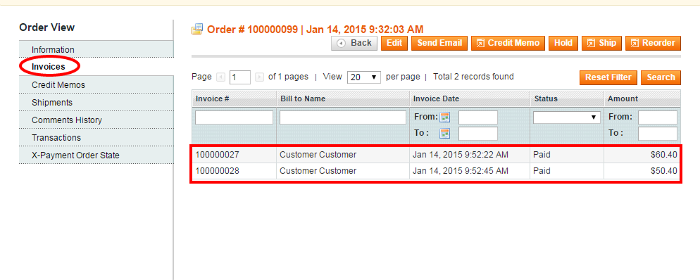
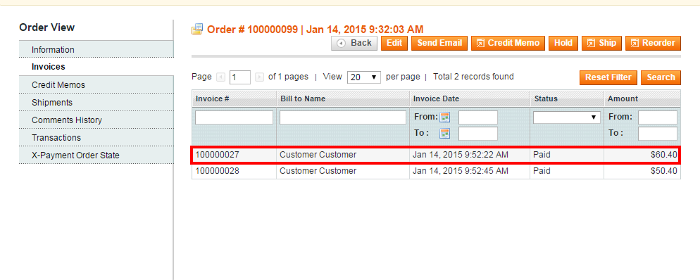
- Locate the invoice for the item(s) you need to refund and click to open it.
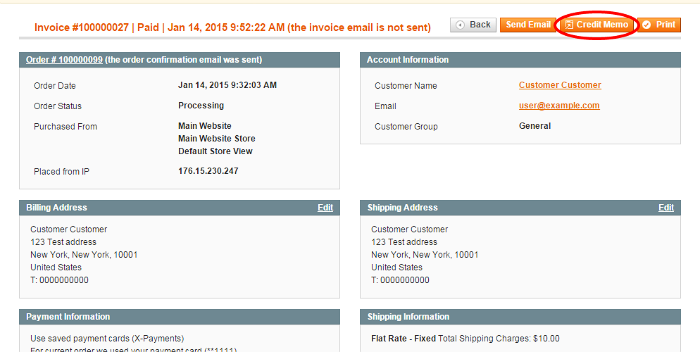
- In the upper right of the Invoice page, click the Credit Memo button to start the refund process by generating a credit memo.
- Scroll down to the "Items to Refund" section.
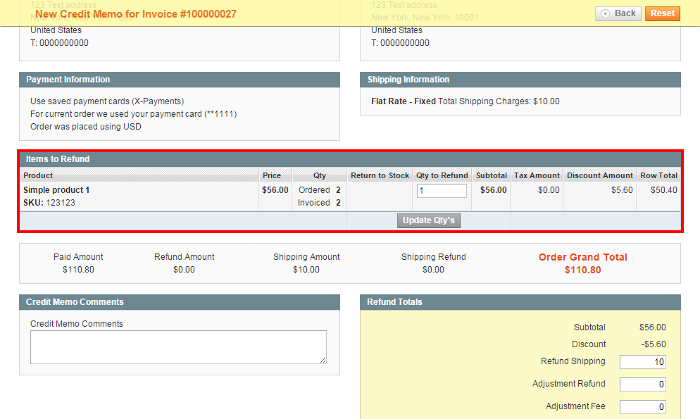
This section provides a list of items pertaining to the invoice and their respective quantities. By default, a refund will be issued for the entire invoice amount. If you are going to refund only some of the items and do a partial refund this time, update the quantities to refund (specify the correct quantities in the Qty to Refund column and click the Update Qty's button); the total amount to be credited will be re-calculated. Select the Return to Stock checkbox for the items that will be returned to inventory (Do not select the checkbox if the items will not be returned). If you want to refund shipping, issue an adjustment refund or add an adjustment fee, specify the respective amounts.Important: Before doing a partial refund, make sure your payment gateway supports this feature. - Work through the process of creating a credit memo as usual: enter credit memo comments as needed, specify whether a notification of the credit memo needs to be emailed to the customer and whether your comments need to be appended to the notification.
- Click Refund or Refund Offline to process the refund (Select the button based on the action you require).
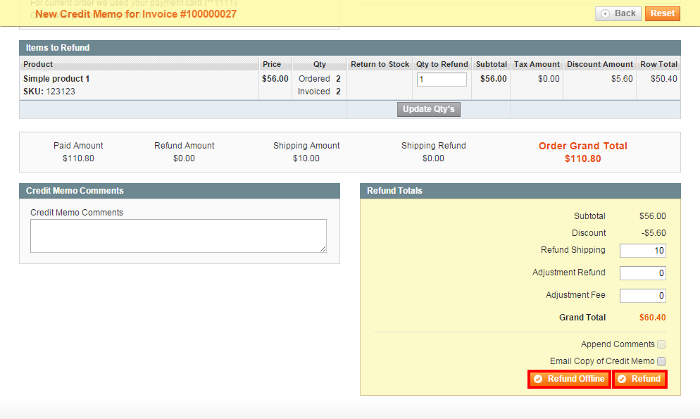
If you select Refund, a refund request will be submitted to the payment gateway via X-Payments, and a refund will be given at the same time that the credit memo is issued. If you select Refund Offline, no refund request will be sent (This option assumes that you will handle the refund directly through the gateway or through the X-Payments back end).
- Once you have completed the above steps, the credit memo should be created. Now if you go back to the order details and select the Credit Memos tab under the Order View menu, you should be able to see the new credit memo added to the list of credit memos pertaining to the order:
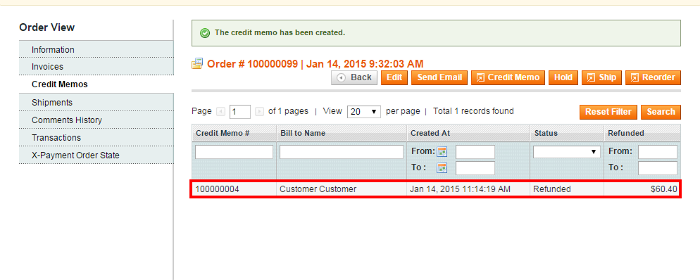
The status will be shown as Refunded.
If you have chosen to complete the refund online, the refund transaction will appear in X-Payments with the same status, Refunded.
If you have chosen the "Refund Offline" option, the transaction will not be reflected in X-Payments.
- Once you have completed the above steps, the credit memo should be created. Now if you go back to the order details and select the Credit Memos tab under the Order View menu, you should be able to see the new credit memo added to the list of credit memos pertaining to the order:
Canceling payments
In the "Auth only" workflow - as opposed to the "Auth and capture" workflow - it is possible to cancel (void) a payment before it has been captured. For example, if you have a payment for which an invoice was created with the "Not Capture" payment option, you can cancel it via the invoice page.
To cancel a payment:
- In the Admin panel, select Sales > Orders:

- In the Orders list, locate the order for which you want to cancel a payment and click to open the order details.
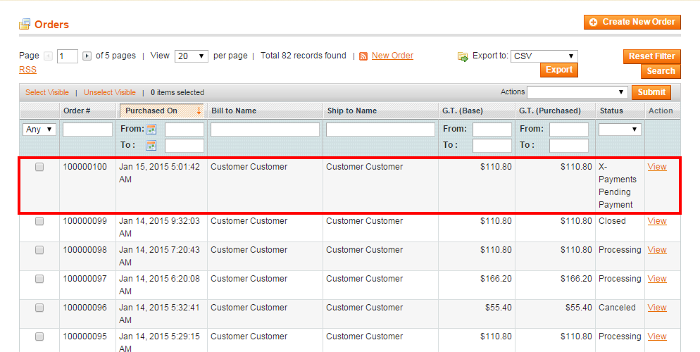
- In the Order View menu on the left-hand side of the screen, select the Invoices tab. This opens a list of invoices pertaining to the order. Locate the invoice you need to cancel and click to open it.
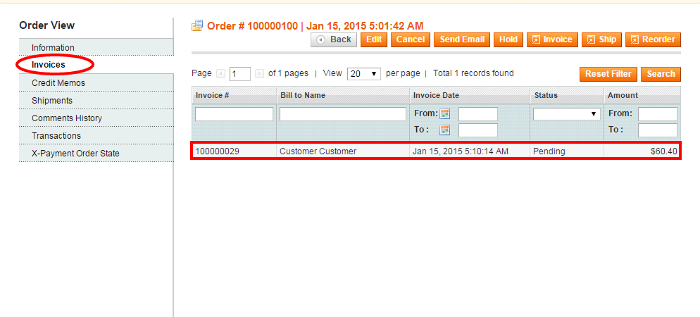
- In the upper right of the Invoice page, click the Cancel button.
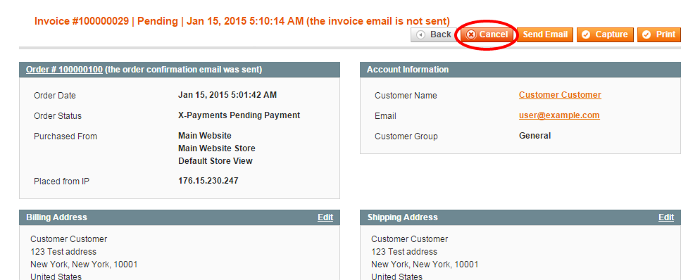
The authorization to capture the invoice amount will be voided. The invoice status will be updated to Canceled.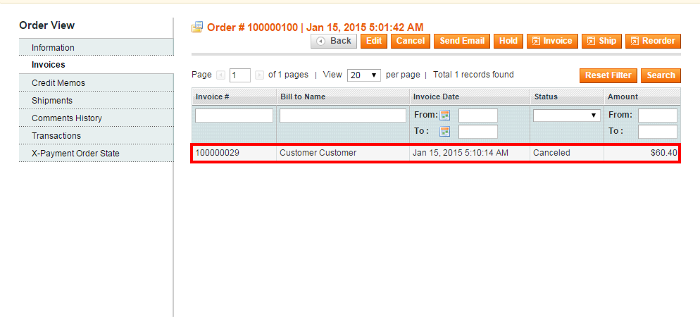
In X-Payments, you should be able to find the respective Void transaction with the status Voided. The status of the payment in X-Payments should be updated to Declined by merchant.
Finding out the order state for X-Payments orders
General information about the current state of an X-Payments order can be viewed in the X-Payment Order State section of the order details.
To access this section:
- In the Admin panel, select Sales > Orders:

- In the Orders list, locate the X-Payments order for which you want to view the information and click to open the order details.

- In the Order View menu on the left-hand side of the screen, select the X-Payment Order State tab. This opens a page like the following:
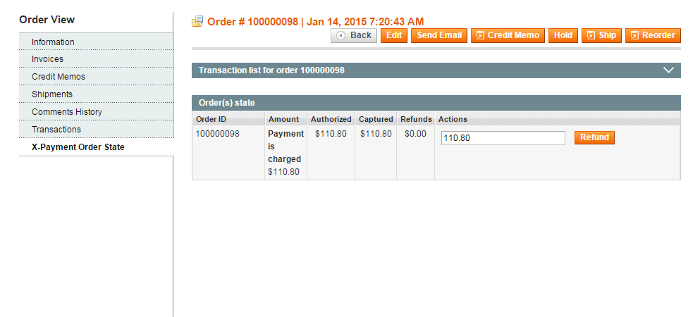
This is the most up-to-date information about the order state, since the information is updated every time the page is loaded or refreshed in the web browser.
On the snapshot above, we see information pertaining to Order #100000098 created on Jan 14, 2015 7:20:43 AM. Based on the table data, we can assume that the order was created for the amount of $110.80. An authorization was obtained for $110.80, of which $110.80 were captured. No refunds were given. The result payment status is charged.
Should we need more information about the specific transactions that were performed on this order, we can expand the section Transaction list for order # by clicking on its header: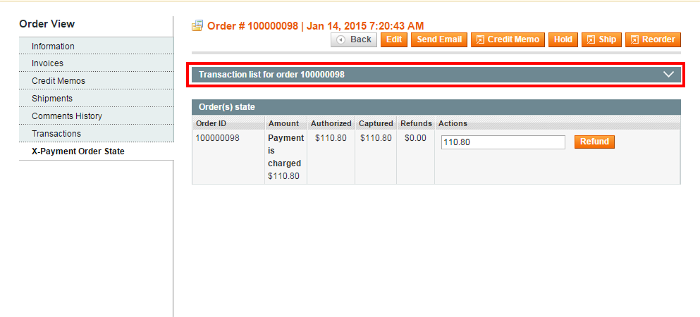
The result will be detailed information about all the payment related transactions that have been performed on this order: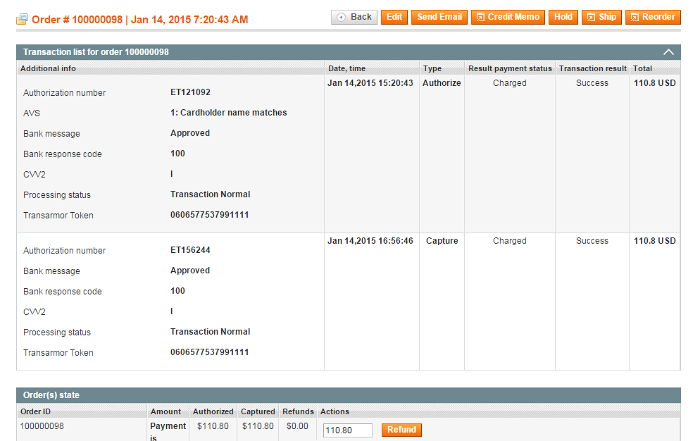
Capture, Void and Refund on orders modified using Magento's default Edit feature
Sometimes you may require to make changes to an order in your store. For example, you may want to change an order if a customer asks you to add an item to their order or if some of the items in the order are out of stock.
When you need to remove an item from an X-Payments order in Magento, you use the Credit Memo feature (For more info, see the section Issuing refunds). When you need to add an item to an order, you do it using Magento's default Edit feature:
You need to know that if you have used Magento's default Edit feature to add items to an X-Payments order, you will need to treat this order in a special way when performing payment related operations like Capture, Void or Refund.
The thing is, when you edit an order in Magento, the original order is canceled, and a new ("child") order is generated based on it. Because one or more items are added to the order, the grand total amount of the "child" order is greater than the grand total amount of the "parent" order. When your store creates a new order, it requests an authorization for the amount equal to the difference between the grand total amount of the child order and the grand total amount of the parent order:
- Xp Transaction amount = Child Order (new order) — Parent order (Edited Order)
The existing authorization inherited from the parent order also keeps for the new order.
Now if you attempt to do a capture of funds on this new order through creating an invoice, you are highly likely to request a capture of an amount that does not match any of the two authorizations. This means, if you use the "Capture Online" option, you won't be able to complete the capture transaction successfully. That is why, when performing a capture on an order that has been edited using Magento's default Edit feature, you should refrain from using the "Capture Online" option. Instead, you may want to use the option "Capture Offline" or (in the event that you do not need an invoice) to perform a capture through the X-Payment Order State tab.
The same holds true for Void and Refund: when you need to perform these actions on an X-Payments order that has been edited in Magento, avoid using the "online" options of the invoice (Invoice: Cancel or Invoice: Credit Memo→Refund Online).
Example:
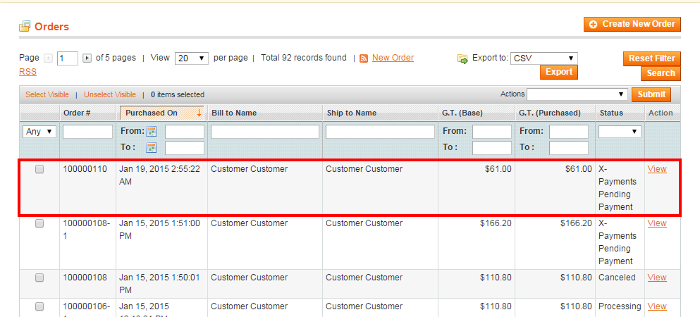
In our Magento store, an order was created (Order #100000110) for a single unit of "Simple product 1".
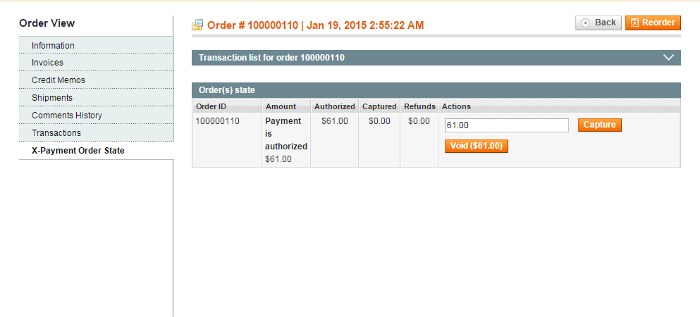
The initial transaction on this order was performed in the "Auth only" mode, and the amount for which an authorization was obtained was $61 ($56 one unit of "Simple product 1" + $5 shipping):
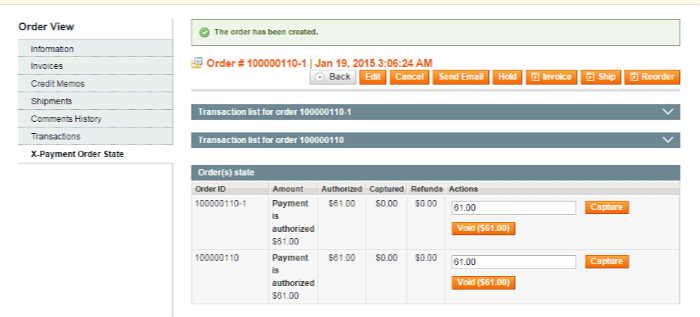
We edited the order by adding to it another unit of "Simple product 1". The order #100000110 was canceled, and, based on it, another order, Order #100000110-1, was generated. On this order, a new authorization was obtained for the difference of #100000110-1 and #100000110 grand total amounts, which was also $61 ($56 one unit of "Simple product 1" + $5 shipping).
Now if you take a look at the information in the X-Payment Order State section, you should see the authorization that Order #100000110-1 inherited from Order #100000110, as well as the new authorization that was created for the difference between the two order amounts:
Please note that these are two separate authorizations ($61 + $61).
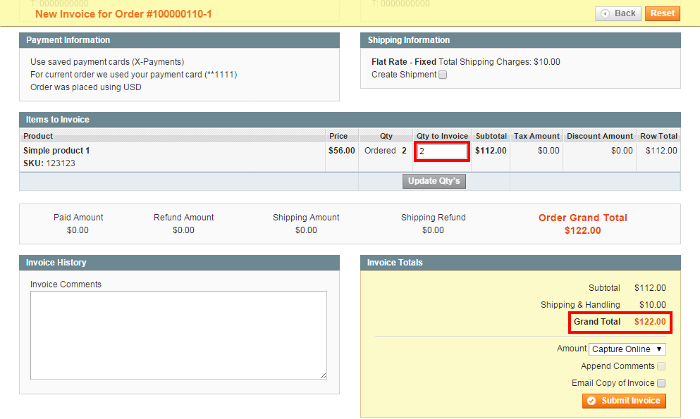
Now if we include both the units of "Simple product 1" from this order into a single invoice, the invoice total amount will be $122 ($112 two units of "Simple product 1" + $10 shipping):
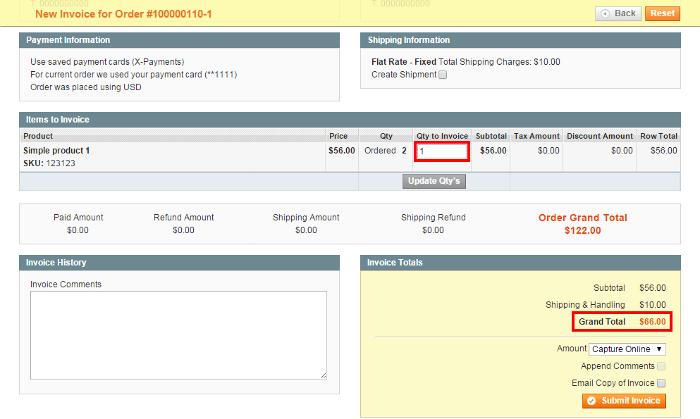
If we invoice the two units of "Simple product 1" separately, the invoice totals will be $66 ($56 first unit of "Simple product 1" + $10 shipping of both the units):
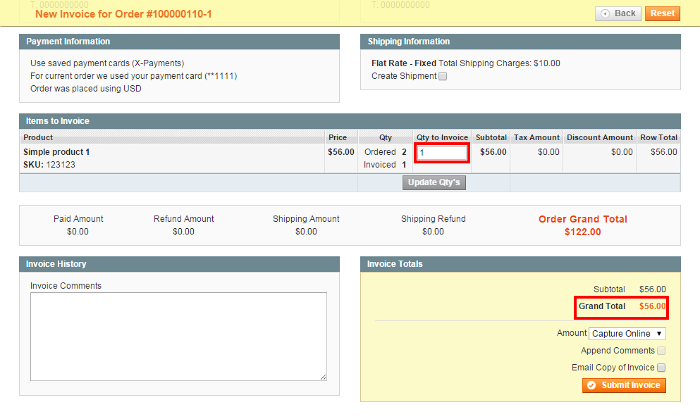
and $56 ($56 second unit of "Simple product 1", no shipping):
In any case, neither of the above amounts equals $61, the amount for which we have two authorizations. So, if you choose the "Capture Online" option when doing a capture, the capture transaction will not be processed successfully.
Capture, Void and Refund via the X-Payment Order State tab
If your store's workflow does not involve invoicing, or you are dealing with an X-Payments order that has previously been edited using Magento's default Edit feature, you can perform Capture, Void and Refund operations via the X-Payment Order State section of the order details (The section can be accessed by clicking the X-Payment Order State tab in the Order View menu). The specific operations available to you depend on the current order state, and you can only see the buttons for the operations that you can perform. If necessary, you can edit the amount on which the operation is performed by editing the contents of the iput field in the Actions column of the table.
Important: If you have already performed a Capture, Void or Refund operation on an order via the X-Payment Order State section, you should not attempt to do any further payment related operations on this order using the online options of the invoice (like Invoice: Cancel, Invoice: Capture Online or Invoice: Credit Memo→Refund Online), as it may cause the following problems:
- Sending a duplicate request for the current transaction;
- Requesting a transaction for an unavailable amount (For example, by doing Invoice: Credit Memo→Refund Online you may be requesting a refund for an amount exceeding the amount that you have captured originally via the Order(s) state block in the X-Payment Order State section).
The opposite is also true: If you have used on a certain order a payment related operation based on an online option of the invoice (Invoice: Cancel, Invoice: Capture Online or Invoice: Credit Memo→Refund Online), do not attempt to perform any further payment related operations on this order via the X-Payment Order State section, as it is likely to cause similar problems.
Recurring Billing in Magento with X-Payments
See the article Recurring Billing in Magento with X-Payments.
Export of order information to StoneEdge Order Manager
Starting with version 1.7.0, the X-Payments connector for Magento supports export of payment information (stuff like transaction IDs, the last four digits of the credit card number, etc.) to StoneEdge Order Manager. If you use X-Payments with Magento and need to export information about payments conducted via X-Payments to StoneEdge Order Manager, contact the X-Payments team for help.
