Difference between revisions of "XP Cloud:Setting up User Authentication with SMS/Text Messages"
m |
m |
||
| Line 6: | Line 6: | ||
To set up user authentication via SMS/text messages, follow these steps: | To set up user authentication via SMS/text messages, follow these steps: | ||
| − | # On your first login to X-Payments Cloud from your store, select SMS/text messages as your preferred user authentication method:<br />[[File:xpc_sms_auth1.png| 670 px | border]]<br />The configuration page for the user authentication method based on using SMS/text messages ('''2-step authentication via SMS/text messages''') opens.<br />[[File:xpc_sms_auth2.png| 670 px | border]]<br />If you are already past the stage of your first login, you can access this page at any time via a link on your X-Payments Cloud profile details page. Here's how to do it: At the top of the X-Payments Cloud settings page in your X-Cart store's Admin area, select '''Settings''' > '''Advanced'''.<br />[[File:xpc_advanced_link.png| 670 px | border]]<br />The X-Payments Cloud admin panel opens in a new browser tab as a standalone site. Go there and select '''Profile''' > '''View details'''. Your profile details page opens. Click on the "SMS/Text message configure" link to access the page you require:<br />[[File: | + | # On your first login to X-Payments Cloud from your store, select SMS/text messages as your preferred user authentication method:<br />[[File:xpc_sms_auth1.png| 670 px | border]]<br />The configuration page for the user authentication method based on using SMS/text messages ('''2-step authentication via SMS/text messages''') opens.<br />[[File:xpc_sms_auth2.png| 670 px | border]]<br />If you are already past the stage of your first login, you can access this page at any time via a link on your X-Payments Cloud profile details page. Here's how to do it: At the top of the X-Payments Cloud settings page in your X-Cart store's Admin area, select '''Settings''' > '''Advanced'''.<br />[[File:xpc_advanced_link.png| 670 px | border]]<br />The X-Payments Cloud admin panel opens in a new browser tab as a standalone site. Go there and select '''Profile''' > '''View details'''. Your profile details page opens. Click on the "SMS/Text message configure" link to access the page you require:<br />[[File:xpc_sms_configure.png|670 px | border]]<br /> |
# Use the '''Phone number''' field to specify the phone number that you would like to use to receive SMS/text messages with one-time passwords for the second step of user authentication. Click '''Save''' to save the changes.<br />[[File:xpc_sms_auth3.png| 670 px | border]]<br />The phone number will be saved, and a new message - "The phone number is not verified" - will be displayed.<br /> | # Use the '''Phone number''' field to specify the phone number that you would like to use to receive SMS/text messages with one-time passwords for the second step of user authentication. Click '''Save''' to save the changes.<br />[[File:xpc_sms_auth3.png| 670 px | border]]<br />The phone number will be saved, and a new message - "The phone number is not verified" - will be displayed.<br /> | ||
# Verify the phone number you have added.<br />Click the '''Send verification code''' button:<br />[[File:xpc_sms_auth4.png| 670 px | border]]<br />Once you do it, an SMS/text message with a one-time password for user authentication will be sent to your phone, and the '''Send verification code''' button will be replaced with a blank field for verification. Type the one-time password you have received into this field, then click '''Verify'''.<br />[[File:xpc_sms_auth5.png| 670 px | border]]<br />Provided that the password is correct, a message saying "The phone number is verified" will be displayed:<br />[[File:xpc_sms_auth6.png| 670 px | border]]<br />This means user authentication via SMS/text messages has been set up and enabled successfully. | # Verify the phone number you have added.<br />Click the '''Send verification code''' button:<br />[[File:xpc_sms_auth4.png| 670 px | border]]<br />Once you do it, an SMS/text message with a one-time password for user authentication will be sent to your phone, and the '''Send verification code''' button will be replaced with a blank field for verification. Type the one-time password you have received into this field, then click '''Verify'''.<br />[[File:xpc_sms_auth5.png| 670 px | border]]<br />Provided that the password is correct, a message saying "The phone number is verified" will be displayed:<br />[[File:xpc_sms_auth6.png| 670 px | border]]<br />This means user authentication via SMS/text messages has been set up and enabled successfully. | ||
Revision as of 21:13, 15 March 2020
- X-Payments Cloud: General information
- Get Started with X-Payments Cloud
- Two-factor User Authentication
- General Settings
- Payment Configurations
- Services
- Users
- User Interface
- Payments
- Payments List
- Payment Statuses
- Search for Payments
- View the Details of a Payment
- Delete a Payment
- Auth and Capture (Capturing Funds)
- Void an Authorization
- Issue a Refund
- Manage High Risk Transactions
- Emulate Transactions
- Clear Cardholder Data
- Tokenization and Re-Use of Saved Cards
- Delayed Payment Feature
- Supported Payment Gateways
- What's New in X-Payments Cloud
X-Payments Cloud can be set up to use an authentication method based on using one-time passwords received via SMS/text messages. The service is provided by Twilio.
To set up user authentication via SMS/text messages, follow these steps:
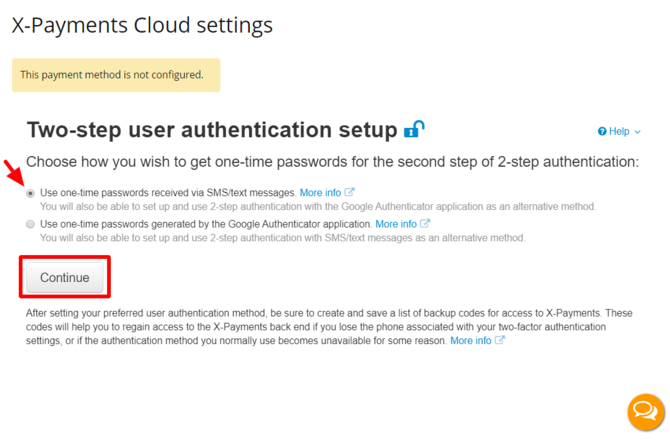
- On your first login to X-Payments Cloud from your store, select SMS/text messages as your preferred user authentication method:
The configuration page for the user authentication method based on using SMS/text messages (2-step authentication via SMS/text messages) opens.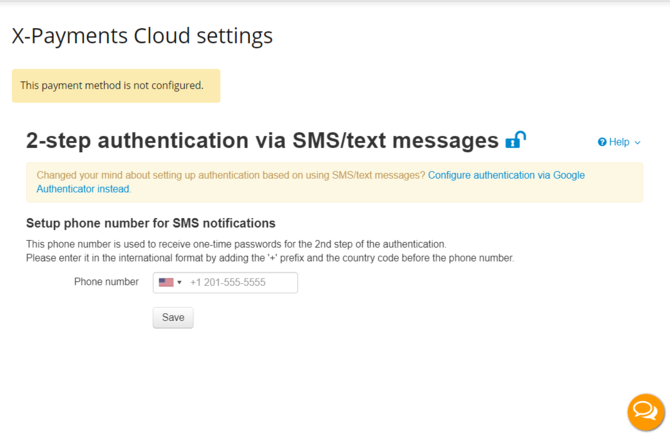
If you are already past the stage of your first login, you can access this page at any time via a link on your X-Payments Cloud profile details page. Here's how to do it: At the top of the X-Payments Cloud settings page in your X-Cart store's Admin area, select Settings > Advanced.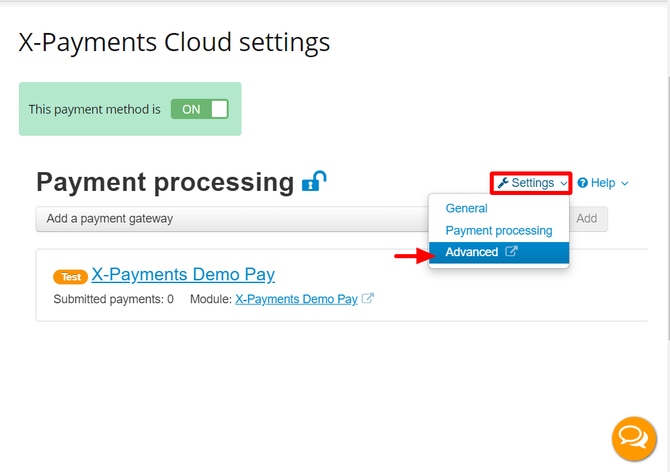
The X-Payments Cloud admin panel opens in a new browser tab as a standalone site. Go there and select Profile > View details. Your profile details page opens. Click on the "SMS/Text message configure" link to access the page you require: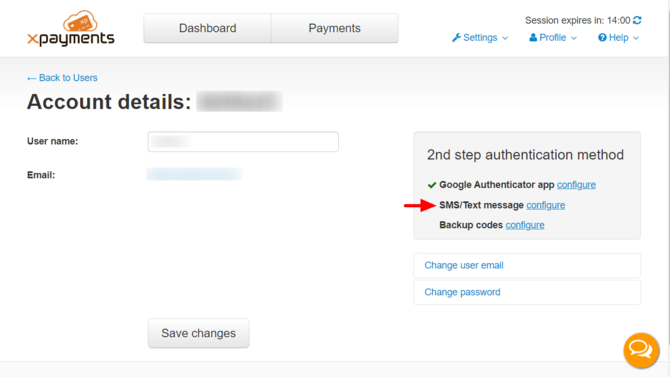
- Use the Phone number field to specify the phone number that you would like to use to receive SMS/text messages with one-time passwords for the second step of user authentication. Click Save to save the changes.
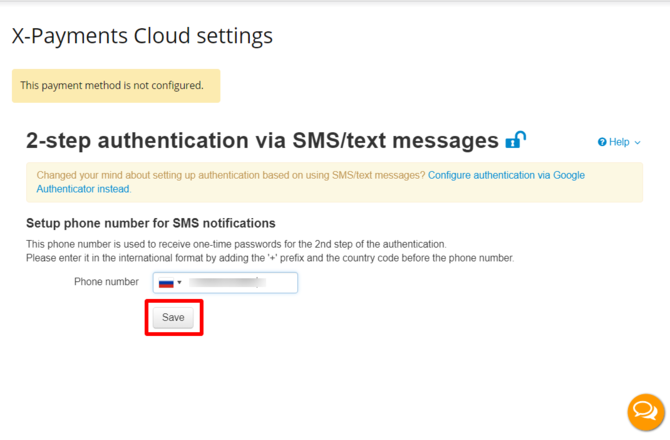
The phone number will be saved, and a new message - "The phone number is not verified" - will be displayed. - Verify the phone number you have added.
Click the Send verification code button: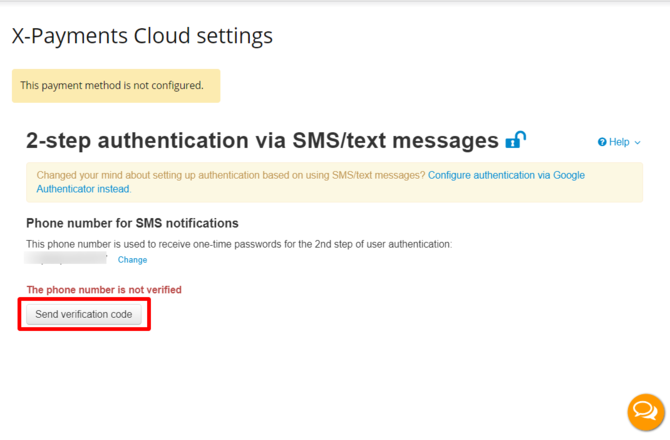
Once you do it, an SMS/text message with a one-time password for user authentication will be sent to your phone, and the Send verification code button will be replaced with a blank field for verification. Type the one-time password you have received into this field, then click Verify.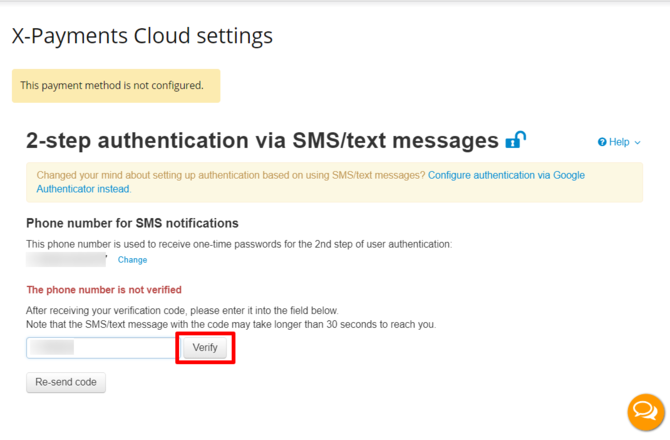
Provided that the password is correct, a message saying "The phone number is verified" will be displayed: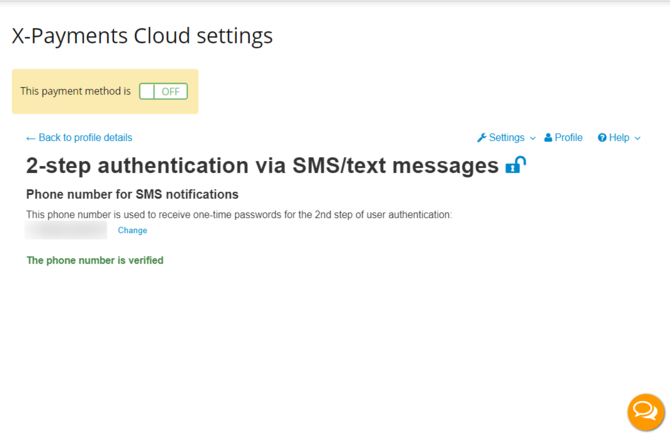
This means user authentication via SMS/text messages has been set up and enabled successfully.
Now if you use this user authentication method, you will need to use one-time passwords sent to your phone.
Important: After setting up your preferred user authentication method, be sure to create and save a list of backup codes for access to X-Payments:
If necessary, you can change the phone number at which you receive SMS/text messages with one-time passwords. Note that to complete the task you will be required to enter a one-time password from an SMS/text message sent to your currently connected device (If you have authentication via Google Authenticator enabled as an additional method, you can also use a one-time password generated by Google Authenticator instead of the password from the SMS/text messsage - these passwords are the same and can be used interchangeably).
