Difference between revisions of "Getting Started Using X-Payments Cloud with WooCommerce"
m |
m |
||
| (2 intermediate revisions by the same user not shown) | |||
| Line 16: | Line 16: | ||
To continue editing, be sure to reload the page before the expiration of your 15-minute edit session; in this case, the edit session will be renewed. If the page does not get reloaded before the edit session expiration time, you will have to re-enter your X-Payments Cloud sign-in credentials to resume editing. If viewing the X-Payments Cloud admin panel from within your WooCommerce based store, after the expiration of your edit session, you will continue seeing the last page you were editing, but the system will switch to Quick access mode. In this mode, you will be able to quickly enable/disable your X-Payments Cloud payment methods without having to sign in to your X-Payments Cloud user account, but you will not be able to adjust any general settings or configure more payment methods. Any sensitive content already entered in X-Payments Cloud will be hidden (Note the contents of the fields API login ID, Transaction key, etc.):<br />[[File:wcxp_asterisks.png | border | 680 px]]<br /> | To continue editing, be sure to reload the page before the expiration of your 15-minute edit session; in this case, the edit session will be renewed. If the page does not get reloaded before the edit session expiration time, you will have to re-enter your X-Payments Cloud sign-in credentials to resume editing. If viewing the X-Payments Cloud admin panel from within your WooCommerce based store, after the expiration of your edit session, you will continue seeing the last page you were editing, but the system will switch to Quick access mode. In this mode, you will be able to quickly enable/disable your X-Payments Cloud payment methods without having to sign in to your X-Payments Cloud user account, but you will not be able to adjust any general settings or configure more payment methods. Any sensitive content already entered in X-Payments Cloud will be hidden (Note the contents of the fields API login ID, Transaction key, etc.):<br />[[File:wcxp_asterisks.png | border | 680 px]]<br /> | ||
| − | To view the hidden content and/or to resume editing the X-Payments Cloud settings, you will need to unlock editing | + | To view the hidden content and/or to resume editing the X-Payments Cloud settings, you will need to unlock editing.<br />To do so: |
| + | # Click on the padlock icon displayed next to the title of the page being viewed or the Unlock editing link at the top right-hand side of the page.<br />[[File:wcxp_unlock_editing.png | border | 680 px]]<br /> | ||
| + | # Enter your X-Payments Cloud account password and click '''Log in'''. | ||
| + | # Complete 2nd step of user authentication by providing an appropriate code (SMS, Google Auth or backup code). | ||
| + | After that, you will have full access to view and edit the details pertaining to your X-Payments Cloud account connection in your WooCommerce store admin panel. | ||
Detailed information on configuring all the settings in your X-Payments Cloud account is available in the [https://www.x-payments.com/help/XP_Cloud:User_manual X-Payments Cloud User manual]. | Detailed information on configuring all the settings in your X-Payments Cloud account is available in the [https://www.x-payments.com/help/XP_Cloud:User_manual X-Payments Cloud User manual]. | ||
Latest revision as of 18:36, 13 July 2020
Once your WooCommerce based store has been connected to X-Payments Cloud, configure X-Payments Cloud as you require. For that you will need to use the X-Payments Cloud admin panel.
The most evident method to access your X-Payments Cloud admin panel is by signing in to your X-Payments Cloud account right from within your WooCommerce based store (via the same section you used to complete the connection). In this case, the X-Payments Cloud admin panel opens within your WooCommerce store admin panel and looks as if it were just another WooCommerce store settings page.
There is also a way to access your X-Payments Cloud admin panel directly (not from within your WooCommerce store, but as a standalone website). For direct access to the standalone version of your X-Payments Cloud admin panel, use the URL https://your_xpc_account.xpayments.com/admin.php replacing the part ‘your_xpc_account’ with your actual X-Payments Cloud account name.
When you use the X-Payments Cloud admin panel from within your WooCommerce store admin panel, you get access to all the features that you need to get X-Payments Cloud minimally configured and running to accept payments. For access to the extended set of features (like customization of the look and feel of your X-Payments Cloud payment form, management of X-Payments Cloud admin users, etc.) you need to go to the standalone version.
For navigation around the different sections of X-Payments Cloud, use the Settings menu at the top right-hand corner of the page: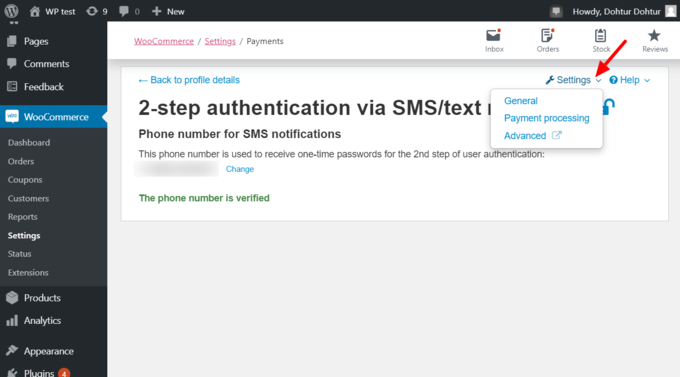
- General is the section where you can adjust your X-Payments Cloud general settings.
- Payment processing is the section where you manage your X-Payments Cloud payment methods.
- Advanced is a link that provides a convenient way for you to switch to the X-Payments Cloud standalone admin panel for access to advanced features.
Note that for security reasons the length of an edit session in X-Payments Cloud is limited to 15 minutes. 30 seconds before your edit session expires, a warning message will pop up on the page being edited to notify you that your current edit session is about to expire.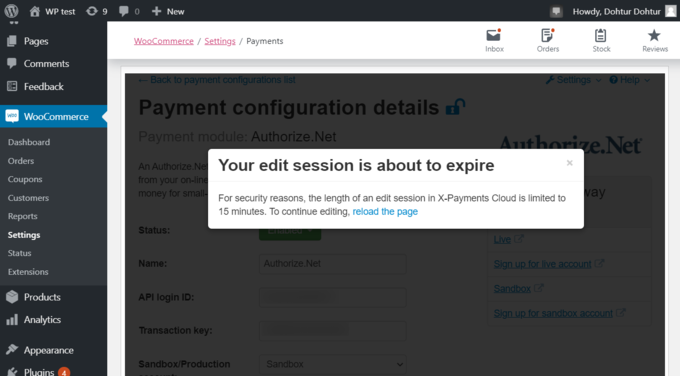
To continue editing, be sure to reload the page before the expiration of your 15-minute edit session; in this case, the edit session will be renewed. If the page does not get reloaded before the edit session expiration time, you will have to re-enter your X-Payments Cloud sign-in credentials to resume editing. If viewing the X-Payments Cloud admin panel from within your WooCommerce based store, after the expiration of your edit session, you will continue seeing the last page you were editing, but the system will switch to Quick access mode. In this mode, you will be able to quickly enable/disable your X-Payments Cloud payment methods without having to sign in to your X-Payments Cloud user account, but you will not be able to adjust any general settings or configure more payment methods. Any sensitive content already entered in X-Payments Cloud will be hidden (Note the contents of the fields API login ID, Transaction key, etc.):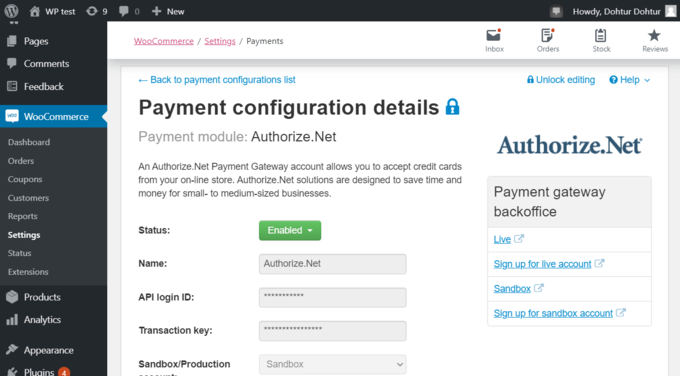
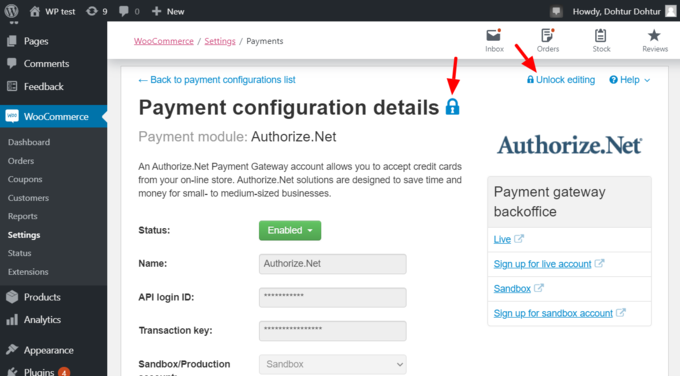
To view the hidden content and/or to resume editing the X-Payments Cloud settings, you will need to unlock editing.
To do so:
- Click on the padlock icon displayed next to the title of the page being viewed or the Unlock editing link at the top right-hand side of the page.
- Enter your X-Payments Cloud account password and click Log in.
- Complete 2nd step of user authentication by providing an appropriate code (SMS, Google Auth or backup code).
After that, you will have full access to view and edit the details pertaining to your X-Payments Cloud account connection in your WooCommerce store admin panel.
Detailed information on configuring all the settings in your X-Payments Cloud account is available in the X-Payments Cloud User manual.
After completing the X-Payments Cloud configuration, make sure your X-Payments Cloud payment method is enabled in your WooCommerce store.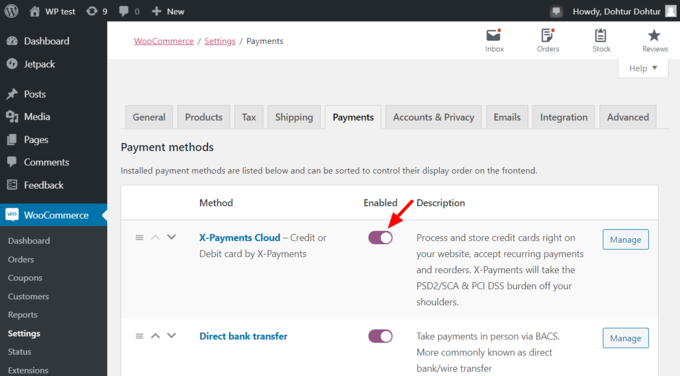
Related pages: