Difference between revisions of "X-Payments:PayPal REST API"
m |
m |
||
| (5 intermediate revisions by the same user not shown) | |||
| Line 62: | Line 62: | ||
|} | |} | ||
| − | Other payment methods supported by X-Payments | + | Other payment methods supported by X-Payments are listed in the section [[X-Payments:Payment_gateways_supported_by_X-Payments_3.1 | X-Payments: Payment gateways supported by X-Payments 3.1]]. |
| − | ===Configure PayPal REST API=== | + | ===Configure PayPal REST API in X-Cart=== |
Prerequisites: | Prerequisites: | ||
| Line 77: | Line 77: | ||
# Go to https://developer.paypal.com/developer/applications and log in to the Dashboard. This will get you to the "My Apps & Credentials" page. | # Go to https://developer.paypal.com/developer/applications and log in to the Dashboard. This will get you to the "My Apps & Credentials" page. | ||
# Depending on what you are going to do - test your checkout process or start real-life payment processing - you will need to choose an appropriate PayPal environment: ''Sandbox'' or ''Live''.<br />[[File:pp_rest_api_live_sandbox.jpg|780px| border]]<br /><br /> | # Depending on what you are going to do - test your checkout process or start real-life payment processing - you will need to choose an appropriate PayPal environment: ''Sandbox'' or ''Live''.<br />[[File:pp_rest_api_live_sandbox.jpg|780px| border]]<br /><br /> | ||
| − | # Choose to create a new app by clicking the '''Create App''' button. <br />[[File:pp_rest_api_create_app.jpg|780px|border]]<br />Once the app has been created, you will get access to the API credentials and settings for it. <br />[[File:pp_rest_api_credentials_settings.jpg|780px|border]]<br />You will need the credentials to connect to X-Payments | + | # Choose to create a new app by clicking the '''Create App''' button. <br />[[File:pp_rest_api_create_app.jpg|780px|border]]<br />Once the app has been created, you will get access to the API credentials and settings for it. <br />[[File:pp_rest_api_credentials_settings.jpg|780px|border]]<br />You will need the credentials to connect to X-Payments, so for now, keep the page open.<br /><br /> |
# In a new browser tab or window, log in to your X-Payments admin panel. Navigate to '''Settings''' > '''Payment configurations'''.<br />[[File:pp_rest_api_payment_configurations.png|780px|border]]<br /><br />The Payment Configurations page opens.<br />[[File:pp_rest_api_payment_configurations1.png|780px|border]]<br /><br /> | # In a new browser tab or window, log in to your X-Payments admin panel. Navigate to '''Settings''' > '''Payment configurations'''.<br />[[File:pp_rest_api_payment_configurations.png|780px|border]]<br /><br />The Payment Configurations page opens.<br />[[File:pp_rest_api_payment_configurations1.png|780px|border]]<br /><br /> | ||
| − | # | + | # From the drop-down box, select PayPal REST API and click '''Add'''.<br />[[File:pp_rest_api_payment_configuration_add.png|780px|border]]<br /><br />The "Add new payment configuration" page for PayPal REST API opens.<br />[[File:pp_rest_api_payment_configuration_add1.png|780px|border]]<br /><br /> |
| − | # In a new browser tab or window, log in to your X-Cart store Admin area. | + | # Provide the credentials for your PayPal app so X-Payments can connect to your PayPal account for payment processing. Also, specify your payment configuration preferences. |
| + | #* '''Name''': The text string entered here will be used as the name to identify the payment configuration in X-Payments admin panel and the Admin area of your X-Cart-based online store. You can keep the proposed name or choose to change it. For example, if you are going to have more than one payment configuration based on PayPal REST API payment integration - like to process payments in more than one currency - it is best to change the name so you can see which payment configuration you are dealing with without having to open its details. For example, you can use a name like "PayPal (REST API) - USD" to reflect the name of the currency that is going to be used for payments via this configuration. | ||
| + | #* '''Client ID''' and '''Secret''': Copy and paste these values from PayPal (from the page you have kept open in another tab of your browser). | ||
| + | #* '''Test/Live mode''': Whether you are using PayPal sandbox environment or production environment. The production environment is used for real payments (Live mode), whereas the sandbox environment is used for testing (Test mode). | ||
| + | #* '''Initial transaction''': The mode in which you want the payment transaction to be conducted when someone buys something at your online store: Auth (authorize the payment amount but not capture the funds yet) or Auth and capture (authorize and capture the payment amount at once). | ||
| + | #* '''3-D Secure mode''': The payment gateway provides a built-in 3-D Secure service. You can specify how you want to use it. Two options are available:<br />''Returns a 3-D Secure contingency when it is a mandate in the region where you operate'';<br />''Trigger 3-D Secure for every transaction, regardless of SCA requirements''. | ||
| + | #* '''3D Secure behavior''': Two options are available:<br />''Accept all transactions'';<br />''Accept transactions with possible liability shift to the card issuer.'' | ||
| + | #* '''Order prefix''': Your trading name or any other prefix that will help you to identify a payment transaction as originating from this specific online store. | ||
| + | #* '''Currency''': The currencies in which you will be able to accept payments via the payment method based on this payment configuration. By default, this setting is pre-set to All supported (N), which means all the currencies supported by the payment gateway - with the number N specifying the number of currencies. To limit the range of currencies that will be accepted, click on the All supported (N) button, uncheck the Select all box - this will unselect all the selected currencies - and check the boxes for the currencies that you will accept. For the sake of example, we are creating a configuration that will support only the United States dollar; so here we need to disable all the currencies but USD. | ||
| + | #* '''Credit card types''': The credit card types you wish to accept via the payment method based on this payment configuration. | ||
| + | #* '''Call-back IPs''': IP addresses of the payment gateway's callback requests. | ||
| + | #* '''Cancel not captured''': Whether authorizations obtained for payments made in the "Auth" mode should be voided automatically within 30 days of payment if the capture of the funds has not been performed.<br /><br /> | ||
| + | # After adjusting the payment configuration settings as you require, be sure to click '''Save''' to save your changes.<br />You have created a payment configuration.<br /><br /> | ||
| + | # Make sure the payment configuration you have created is enabled (On the page with a list of your payment configurations, there should be a green button near the payment configuration name saying "Enabled").<br /><br /> | ||
| + | # If you haven't yet done so, provide X-Payments with data required to connect to your X-Cart 5 store.<br />In the X-Payments back end, go to '''Settings''' > '''Online store'''.<br />[[File:pp_rest_api_online_store.png|780px|border]]<br /><br />Use the page to specify your online store details.<br />[[File:pp_rest_api_online_store1.png|780px|border]]<br /><br />Detailed instructions for configuring your online store details in X-Payments can be found in the section [[X-Payments:Managing_store_connections | Managing Store Connections]] of X-Payments User manual.<br /><br />Before you proceed, please pay attention to the "Connection" section on the right-hand side of the page with your X-Cart 5 store’s details in X-Payments. Here you should be able to see the so-called configuration bundle for your X-Cart 5 store. The configuration bundle provides a quick method to deploy X-Payments connection settings in your X-Cart 5 store. You will need this bundle when you will be configuring the connection in your X-Cart 5 Admin area. For now, simply click the Copy button to copy the bundle to clipboard so you have it at the ready when it is time to paste it on the X-Cart 5 end.<br /><br /> | ||
| + | # In a new browser tab or window, log in to your X-Cart store Admin area. Go to '''My Apps''' and navigate to the X-Payments v1.x-3.x connector settings page. If you have not yet connected your store to X-Payments using the configuration bundle, do so. Detailed instructions for that can be found [https://support.x-cart.com/en/articles/5411843-configure-the-connection-in-the-x-cart-admin-area here].<br /> If you have completed the connection process earlier, you simply have to re-import payment methods from X-Payments using the '''Re-import payment methods''' button.<br /><br /> | ||
| + | # Make sure the payment method for PayPal REST API is enabled. PayPal REST API X-Payments integration supports tokenization, so you can also enable PCI compliant credit card saving with this method by selecting the Save cards option for PayPal REST API.<br /><br /> | ||
| + | # If you want to use PayPal REST API as the payment method for customers saving their credit cards with your store, specify it as the method for credit card setup in the "Save credit card setup" section. You will also need to make sure the "Use a saved credit card" method is enabled in your X-Cart store.<br /><br /> | ||
| + | That is it. You have configured PayPal REST API to be used as a payment method. | ||
| + | <br /> | ||
| + | |||
| + | '''Important''': If using PayPal REST API, be sure to also configure [https://support.x-cart.com/en/articles/4506748-paypal-checkout PayPal Checkout]. | ||
Latest revision as of 00:17, 31 March 2022
Stores connected to X-Payments can be configured to use payment processing via PayPal REST API.
PayPal REST API Features
Other payment methods supported by X-Payments are listed in the section X-Payments: Payment gateways supported by X-Payments 3.1.
Configure PayPal REST API in X-Cart
Prerequisites:
- You need to have a PayPal Business account. You can sign up for one at paypal.com
- You need to have an account with X-Payments. X-Payments v1.x-3.x User Manual is available.
- Your X-Cart store needs to be connected to your X-Payments account. For X-Payments v1.x-3.x, the connection can be made using the X-Payments v1.x-3.x Connector add-on.
To configure PayPal REST API:
- Go to https://developer.paypal.com/developer/applications and log in to the Dashboard. This will get you to the "My Apps & Credentials" page.
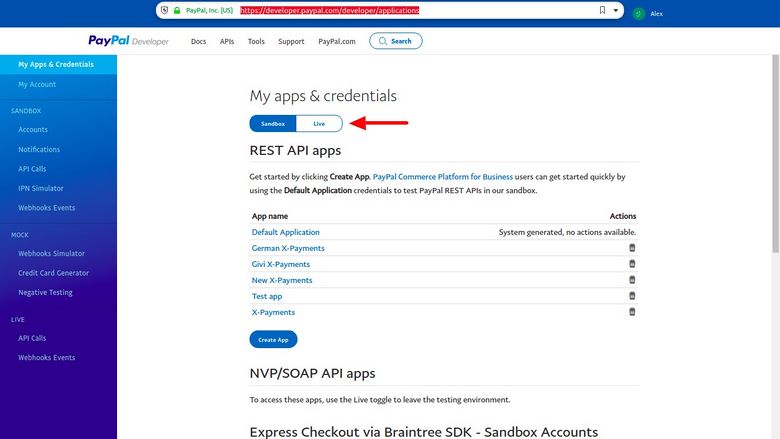
- Depending on what you are going to do - test your checkout process or start real-life payment processing - you will need to choose an appropriate PayPal environment: Sandbox or Live.
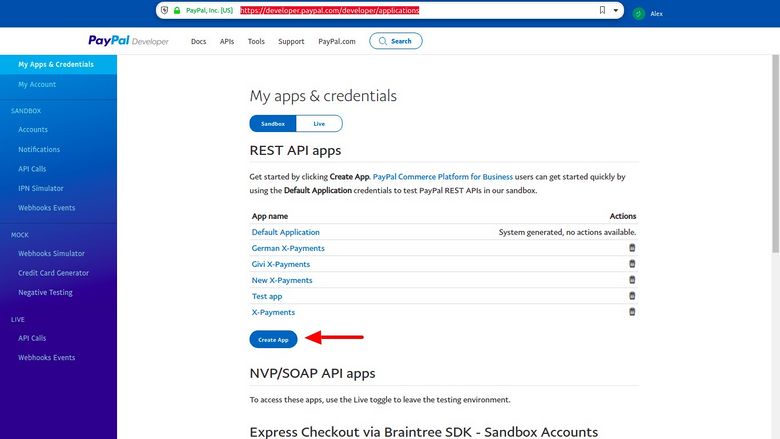
- Choose to create a new app by clicking the Create App button.
Once the app has been created, you will get access to the API credentials and settings for it.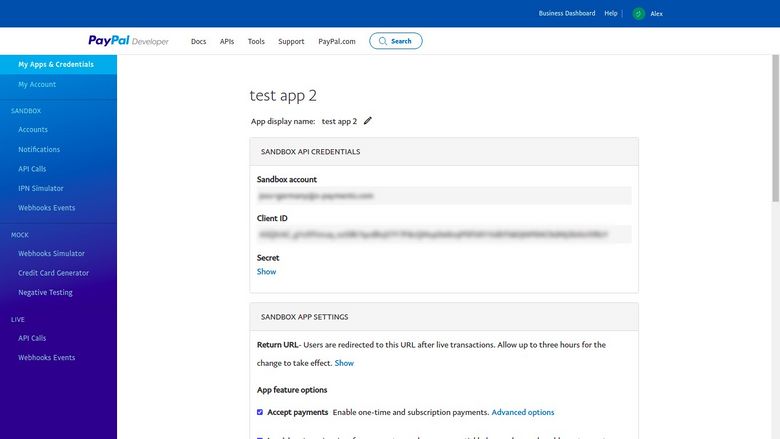
You will need the credentials to connect to X-Payments, so for now, keep the page open. - In a new browser tab or window, log in to your X-Payments admin panel. Navigate to Settings > Payment configurations.
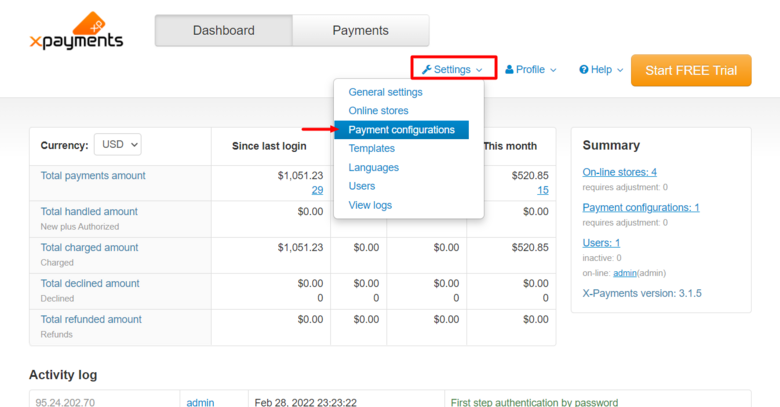
The Payment Configurations page opens.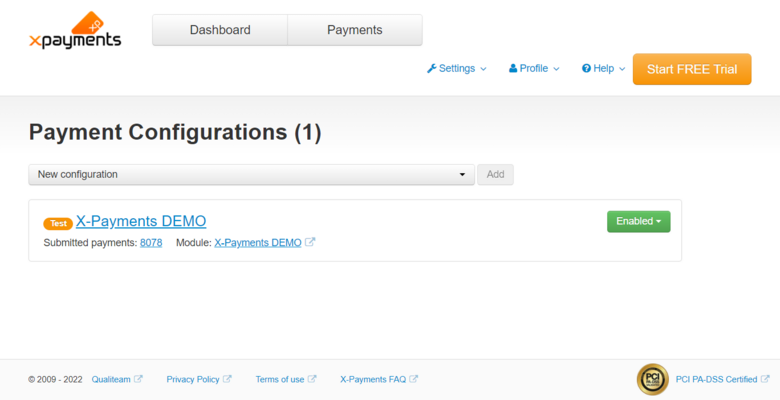
- From the drop-down box, select PayPal REST API and click Add.
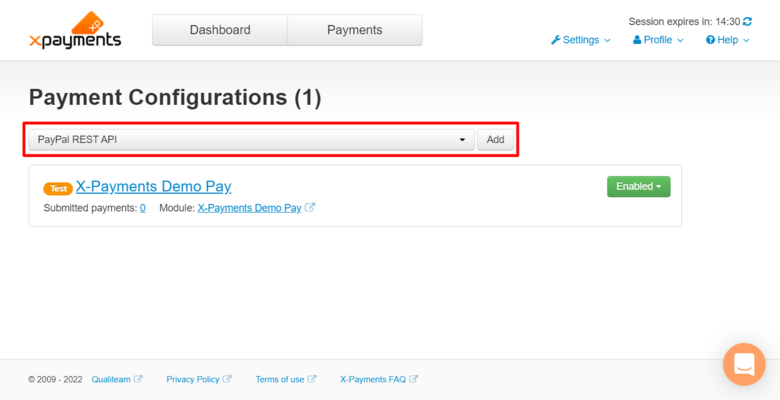
The "Add new payment configuration" page for PayPal REST API opens.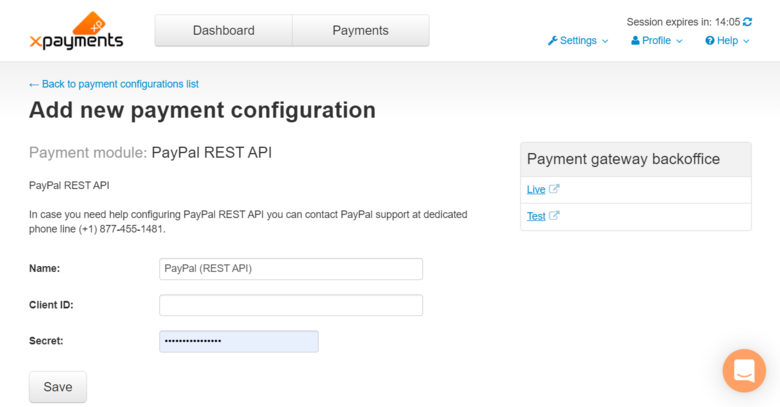
- Provide the credentials for your PayPal app so X-Payments can connect to your PayPal account for payment processing. Also, specify your payment configuration preferences.
- Name: The text string entered here will be used as the name to identify the payment configuration in X-Payments admin panel and the Admin area of your X-Cart-based online store. You can keep the proposed name or choose to change it. For example, if you are going to have more than one payment configuration based on PayPal REST API payment integration - like to process payments in more than one currency - it is best to change the name so you can see which payment configuration you are dealing with without having to open its details. For example, you can use a name like "PayPal (REST API) - USD" to reflect the name of the currency that is going to be used for payments via this configuration.
- Client ID and Secret: Copy and paste these values from PayPal (from the page you have kept open in another tab of your browser).
- Test/Live mode: Whether you are using PayPal sandbox environment or production environment. The production environment is used for real payments (Live mode), whereas the sandbox environment is used for testing (Test mode).
- Initial transaction: The mode in which you want the payment transaction to be conducted when someone buys something at your online store: Auth (authorize the payment amount but not capture the funds yet) or Auth and capture (authorize and capture the payment amount at once).
- 3-D Secure mode: The payment gateway provides a built-in 3-D Secure service. You can specify how you want to use it. Two options are available:
Returns a 3-D Secure contingency when it is a mandate in the region where you operate;
Trigger 3-D Secure for every transaction, regardless of SCA requirements. - 3D Secure behavior: Two options are available:
Accept all transactions;
Accept transactions with possible liability shift to the card issuer. - Order prefix: Your trading name or any other prefix that will help you to identify a payment transaction as originating from this specific online store.
- Currency: The currencies in which you will be able to accept payments via the payment method based on this payment configuration. By default, this setting is pre-set to All supported (N), which means all the currencies supported by the payment gateway - with the number N specifying the number of currencies. To limit the range of currencies that will be accepted, click on the All supported (N) button, uncheck the Select all box - this will unselect all the selected currencies - and check the boxes for the currencies that you will accept. For the sake of example, we are creating a configuration that will support only the United States dollar; so here we need to disable all the currencies but USD.
- Credit card types: The credit card types you wish to accept via the payment method based on this payment configuration.
- Call-back IPs: IP addresses of the payment gateway's callback requests.
- Cancel not captured: Whether authorizations obtained for payments made in the "Auth" mode should be voided automatically within 30 days of payment if the capture of the funds has not been performed.
- After adjusting the payment configuration settings as you require, be sure to click Save to save your changes.
You have created a payment configuration. - Make sure the payment configuration you have created is enabled (On the page with a list of your payment configurations, there should be a green button near the payment configuration name saying "Enabled").
- If you haven't yet done so, provide X-Payments with data required to connect to your X-Cart 5 store.
In the X-Payments back end, go to Settings > Online store.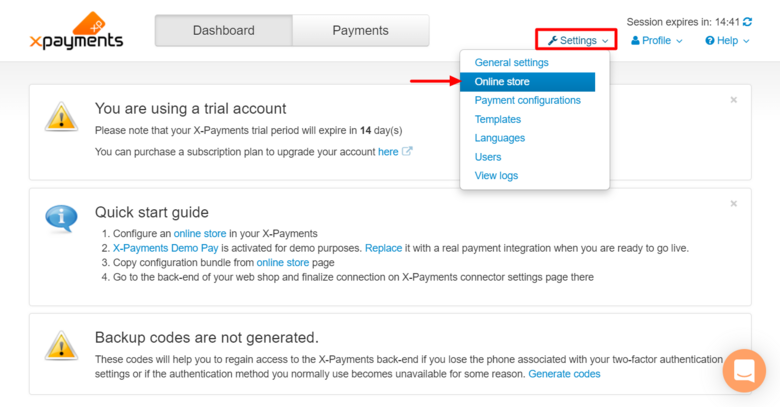
Use the page to specify your online store details.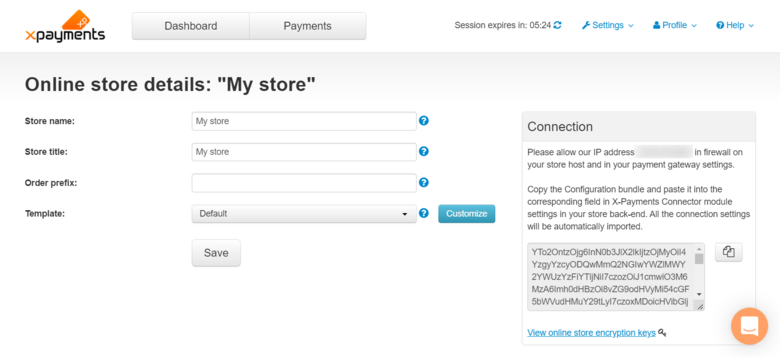
Detailed instructions for configuring your online store details in X-Payments can be found in the section Managing Store Connections of X-Payments User manual.
Before you proceed, please pay attention to the "Connection" section on the right-hand side of the page with your X-Cart 5 store’s details in X-Payments. Here you should be able to see the so-called configuration bundle for your X-Cart 5 store. The configuration bundle provides a quick method to deploy X-Payments connection settings in your X-Cart 5 store. You will need this bundle when you will be configuring the connection in your X-Cart 5 Admin area. For now, simply click the Copy button to copy the bundle to clipboard so you have it at the ready when it is time to paste it on the X-Cart 5 end. - In a new browser tab or window, log in to your X-Cart store Admin area. Go to My Apps and navigate to the X-Payments v1.x-3.x connector settings page. If you have not yet connected your store to X-Payments using the configuration bundle, do so. Detailed instructions for that can be found here.
If you have completed the connection process earlier, you simply have to re-import payment methods from X-Payments using the Re-import payment methods button. - Make sure the payment method for PayPal REST API is enabled. PayPal REST API X-Payments integration supports tokenization, so you can also enable PCI compliant credit card saving with this method by selecting the Save cards option for PayPal REST API.
- If you want to use PayPal REST API as the payment method for customers saving their credit cards with your store, specify it as the method for credit card setup in the "Save credit card setup" section. You will also need to make sure the "Use a saved credit card" method is enabled in your X-Cart store.
That is it. You have configured PayPal REST API to be used as a payment method.
Important: If using PayPal REST API, be sure to also configure PayPal Checkout.