Difference between revisions of "XP Cloud:Searching for Payments"
m |
m |
||
| Line 1: | Line 1: | ||
| + | <noinclude>{{XPC manual TOC}}</noinclude> | ||
| + | |||
X-Payments Cloud allows you to filter the [[X-Payments_Cloud:Payments List |payments list]] to find specific payments based on certain criteria. | X-Payments Cloud allows you to filter the [[X-Payments_Cloud:Payments List |payments list]] to find specific payments based on certain criteria. | ||
| Line 17: | Line 19: | ||
To clear the Advanced search form and start over, use the '''Reset form''' button at the bottom of the form. | To clear the Advanced search form and start over, use the '''Reset form''' button at the bottom of the form. | ||
| + | |||
| + | <noinclude>__NOTOC__</noinclude> | ||
| + | |||
| + | [[Category:X-Payments Cloud User Manual]] | ||
Revision as of 19:41, 16 February 2020
- X-Payments Cloud: General information
- Get Started with X-Payments Cloud
- Two-factor User Authentication
- General Settings
- Payment Configurations
- Services
- Users
- User Interface
- Payments
- Payments List
- Payment Statuses
- Search for Payments
- View the Details of a Payment
- Delete a Payment
- Auth and Capture (Capturing Funds)
- Void an Authorization
- Issue a Refund
- Manage High Risk Transactions
- Emulate Transactions
- Clear Cardholder Data
- Tokenization and Re-Use of Saved Cards
- Delayed Payment Feature
- Supported Payment Gateways
- What's New in X-Payments Cloud
X-Payments Cloud allows you to filter the payments list to find specific payments based on certain criteria.
To search for a payment or a group of payments:
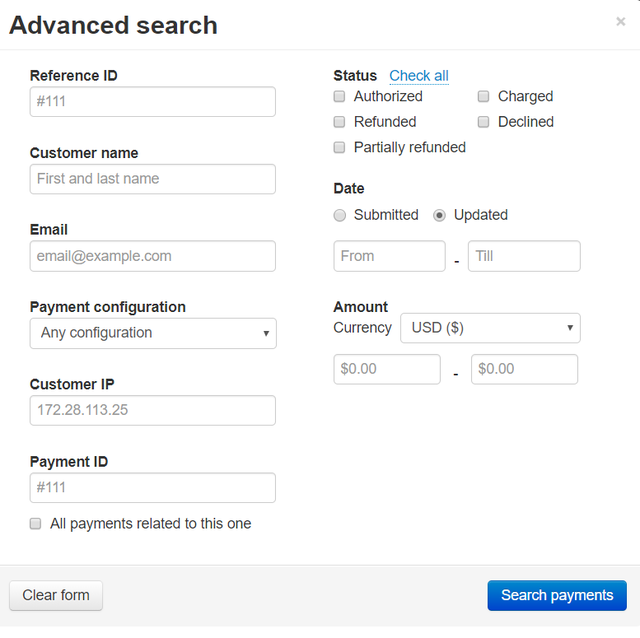
- Click on the Advanced search link above the Payments table to access the Advanced search form:

- In the Advanced search form, specify your search criteria:
- Reference ID: Reference ID associated with the payment(s). Reference ID is obtained from the online store. It identifies the online store order for which the payment was made.
- Customer name: Name of the customer associated with the payment(s).
- Email: Email address of the customer associated with the payment(s).
- Payment configuration: The payment configuration that was used for the payment(s).
- Customer IP: The IP address of the customer associated with the payment(s).
- Payment ID: The payment ID.
- Status: Specify the payment statuses you want to be displayed.
- Date: Specify the time period during which the payment(s) were submitted/updated.
- Amount: Specify the currency that was used for the payment(s) and the payment amount range.
- All payments related to this one: If searching for all the payments associated with a specific payment, enable this checkbox.
- Click Search payments. The Advanced search will be closed, and you will see a list of payments filtered according to the search criteria you have provided.
To clear the Advanced search form and start over, use the Reset form button at the bottom of the form.