Difference between revisions of "XP Cloud:Apple Pay"
m |
m |
||
| Line 11: | Line 11: | ||
==Enable Apple Pay Payment Method== | ==Enable Apple Pay Payment Method== | ||
| + | '''Important''': Apple Pay payment method is not an independent payment method; for its operation, it requires the payment method "X-Payments Cloud" to be active/enabled. Before you attempt to enable Apple Pay, please ensure your main X-Payments Cloud payment method is properly configured and working. | ||
| + | |||
To enable Apple Pay support in X-Payments Cloud, complete the steps below: | To enable Apple Pay support in X-Payments Cloud, complete the steps below: | ||
| − | # In X-Payments Cloud, configure and enable at least one payment configuration based on a payment gateway integration with Apple Pay support (See the list above). For example, if you want payments tokenized via Apple Pay to be processed via Authorize.Net, go to '''Settings''' > '''Payment processing''', add a payment configuration for Authorize.Net and make sure it is enabled.<br />[[File:authorize_net_enabled.png| 670 px | border]]<br />More information on the management of payment configurations in X-Payments Cloud is available in the section [[XP_Cloud:Payment_Configurations | Payment Configurations]].<br /><br /> | + | # In X-Payments Cloud, configure and enable at least one payment configuration based on a payment gateway integration with Apple Pay support (See the list above). For example, if you want payments tokenized via Apple Pay to be processed via Authorize.Net, go to '''Settings''' > '''Payment processing''', add a payment configuration for Authorize.Net and make sure it is enabled. The screenshot below demonstrates adding a payment configuration for Authorize.Net in the standalone X-Payments Cloud admin panel; however, you do not have to use the standalone panel - the same can be done via the integrated X-Payments Cloud panel in your store's admin. <br />[[File:authorize_net_enabled.png| 670 px | border]]<br />More information on the management of payment configurations in X-Payments Cloud is available in the section [[XP_Cloud:Payment_Configurations | Payment Configurations]].<br />Note that if you have already added the payment configuration you require for Apple Pay when configuring your main X-Payments Cloud payment method, you do not need to add it a second time for Apple Pay separately.<br /><br /> |
| − | # | + | # Configure Apple Pay as a service in X-Payments Cloud. This can be done via the '''Services''' section of the [[XP_Cloud:General_Settings | General settings]] page ('''Settings''' > '''General'''). The screenshot below shows the '''Services''' section of the General settings page as it appears in the standalone X-Payments Cloud admin panel; however, you do not have to use the standalone panel - the same can be done via the integrated X-Payments Cloud panel in your store's admin.<br />[[File:xpc_apple_pay_service_configure.png| 670 px | border]]<br />See the section [[#Configure Apple Pay Service in X-Payments Cloud]] further below for detailed instructions on configuring Apple Pay service.<br /><br /> |
| − | # Make sure the payment method "Apple Pay" in your store is active/enabled. The following screenshot was made in the Payment methods section of an X-Cart Cloud based store; stores based on other platforms will have their own sections to manage payment methods.<br />[[File:xcxpc_apple_pay_method.png | 670 px | border]]<br /> | + | # Make sure the payment method "Apple Pay" in your store is active/enabled. The following screenshot was made in the Payment methods section of an X-Cart Cloud based store; stores based on other platforms will have their own sections to manage payment methods.<br />[[File:xcxpc_apple_pay_method.png | 670 px | border]]<br /><br /> |
| + | |||
| + | After this Apple Pay will become available as a method of payment in your store. | ||
| + | |||
| + | |||
| + | |||
===Configure Apple Pay Service in X-Payments Cloud=== | ===Configure Apple Pay Service in X-Payments Cloud=== | ||
Revision as of 11:48, 1 September 2020
Apple Pay in X-Payments Cloud
Advanced X-Payments plans (100K or more transactions per year) enable you to accept payments via Apple Pay.
Apple Pay is not an independent payment gateway, but a means of card tokenization that allows buyers to pay at your store without getting you to handle and store sensitive payment card information. It is a feature currently supported only by some payment gateways, and to be able to offer Apple Pay as a method of payment on your store website, you need to be using for your X-Payments Cloud payment method a payment configuration based on one of the following payment gateway integrations:
- Authorize.Net;
- Braintree, direct integration with CC storing;
- Chase Paymentech Orbital;
- CyberSource - SOAP toolkit API;
- First Data Payeezy Gateway (formerly Global Gateway e4).
That, of course, does not mean you can use only one. X-Payments allows you to use multiple payment configurations with Apple Pay support at the same time, and the selection of payment gateway through which a specific Apple Pay payment will be processed will be made by X-Payments automatically, as usual, based on the settings of specific payment configurations in your X-Payments Cloud instance, like allowed card types and currency.
Enable Apple Pay Payment Method
Important: Apple Pay payment method is not an independent payment method; for its operation, it requires the payment method "X-Payments Cloud" to be active/enabled. Before you attempt to enable Apple Pay, please ensure your main X-Payments Cloud payment method is properly configured and working.
To enable Apple Pay support in X-Payments Cloud, complete the steps below:
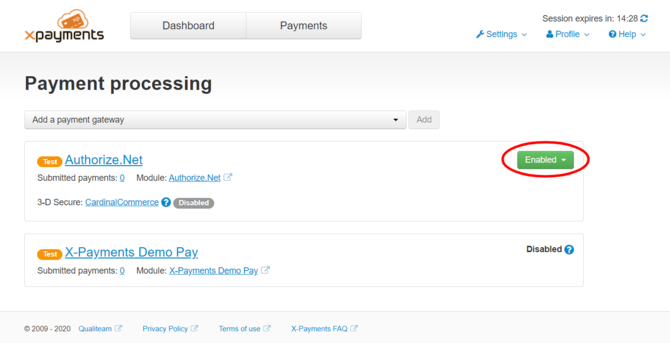
- In X-Payments Cloud, configure and enable at least one payment configuration based on a payment gateway integration with Apple Pay support (See the list above). For example, if you want payments tokenized via Apple Pay to be processed via Authorize.Net, go to Settings > Payment processing, add a payment configuration for Authorize.Net and make sure it is enabled. The screenshot below demonstrates adding a payment configuration for Authorize.Net in the standalone X-Payments Cloud admin panel; however, you do not have to use the standalone panel - the same can be done via the integrated X-Payments Cloud panel in your store's admin.

More information on the management of payment configurations in X-Payments Cloud is available in the section Payment Configurations.
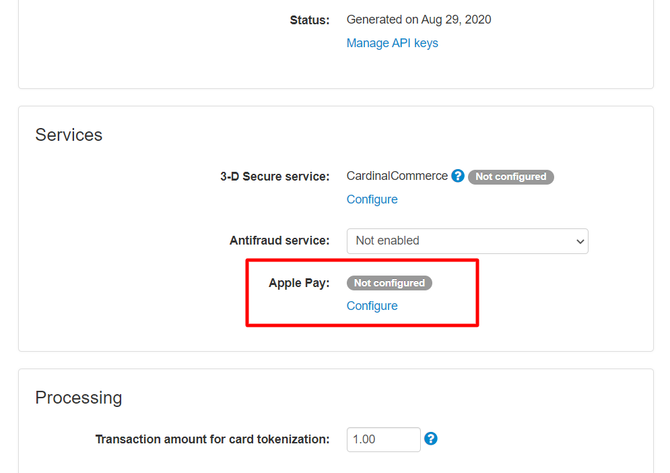
Note that if you have already added the payment configuration you require for Apple Pay when configuring your main X-Payments Cloud payment method, you do not need to add it a second time for Apple Pay separately. - Configure Apple Pay as a service in X-Payments Cloud. This can be done via the Services section of the General settings page (Settings > General). The screenshot below shows the Services section of the General settings page as it appears in the standalone X-Payments Cloud admin panel; however, you do not have to use the standalone panel - the same can be done via the integrated X-Payments Cloud panel in your store's admin.

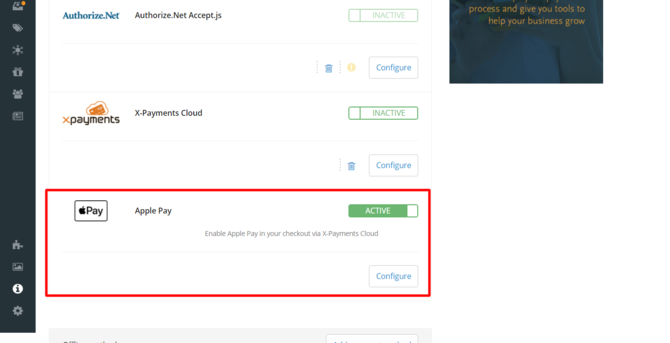
See the section #Configure Apple Pay Service in X-Payments Cloud further below for detailed instructions on configuring Apple Pay service. - Make sure the payment method "Apple Pay" in your store is active/enabled. The following screenshot was made in the Payment methods section of an X-Cart Cloud based store; stores based on other platforms will have their own sections to manage payment methods.

After this Apple Pay will become available as a method of payment in your store.