Difference between revisions of "X-Payments:X-Payments-Hosted-FAQ"
(→How to configure FTP client to connect to the yourdomain.x-checkout.com to access skins and logs?) |
Alex Mulin (talk | contribs) |
||
| Line 1: | Line 1: | ||
===What do I need to put as "Callback IP"?=== | ===What do I need to put as "Callback IP"?=== | ||
| − | If you use the X-Payments Hosted solution you should use IP address '''98.142.211.162''' if your account is based on X-Payments v1.x or v2.x or '''104.200.146.25''' if X-Payments v3.x | + | If you use the X-Payments Hosted solution at "*.x-checkout.com" domain you should use IP address '''98.142.211.162''' if your account is based on X-Payments v1.x or v2.x or '''104.200.146.25''' if X-Payments v3.x |
| + | If you use X-Payments Hosted at "*.xpayments.com" domain you need to specify 52.36.122.200. | ||
===How to configure an FTP client to connect to the yourdomain.x-checkout.com to access skins and logs?=== | ===How to configure an FTP client to connect to the yourdomain.x-checkout.com to access skins and logs?=== | ||
Revision as of 17:22, 20 April 2017
What do I need to put as "Callback IP"?
If you use the X-Payments Hosted solution at "*.x-checkout.com" domain you should use IP address 98.142.211.162 if your account is based on X-Payments v1.x or v2.x or 104.200.146.25 if X-Payments v3.x If you use X-Payments Hosted at "*.xpayments.com" domain you need to specify 52.36.122.200.
How to configure an FTP client to connect to the yourdomain.x-checkout.com to access skins and logs?
X-Payments 3.x does not support FTP connections. The instructions below are valid only for X-Payments versions 2.x and earlier.
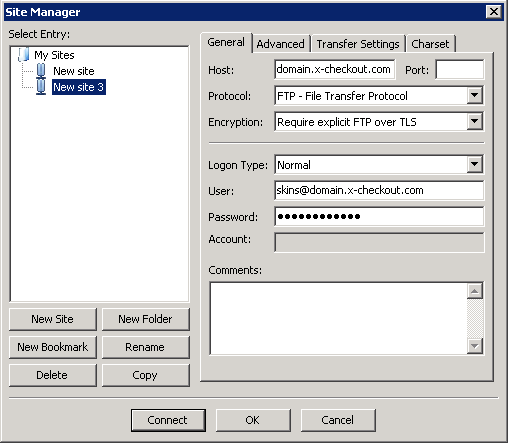
To establish an FTP connection, you should use the details from the email received when your account was created:
- host: yourdomain.x-checkout.com
- user: skins@yourdomain.x-checkout.com
- password: the one that you've received
- host: yourdomain.x-checkout.com
Please make sure that the "Explicit FTP over TLS" mode is used. This is required because plain text authentication is not allowed for PCI compliance.
Instructions for FileZilla FTP Client:
- Start FileZilla
- Go to File -> Site Manager
- Click New site
- Enter the connection settings:
- Click the Connect button
